


Transcript: WGAN-TV | How to (Easily) Add Lights to Matterport Pro2 Camera13562
Pages:
1
 WGAN Forum WGAN ForumFounder and Advisor Atlanta, Georgia |
DanSmigrod private msg quote post Address this user | |
| 84-WGAN-TV How to (Easily) Add LitraTorch 20 Lighting to a Matterport Pro2 3D Camera | Simsbury, CT-based Matterport Service Provider Tony Healy (@Capture) with Capture, LLC did struggle with Matterport scans that needed additional light - until he helped pioneer a solution that Litra now sells: LitraTorch 2.0 Reality Capture Lighting Kit | Thursday, 12 November 2020 Video: LitraTorch 2.0 Reality Capture Lighting Kit In Use | Video courtesy of Litra YouTube Channel | 3 November 2020 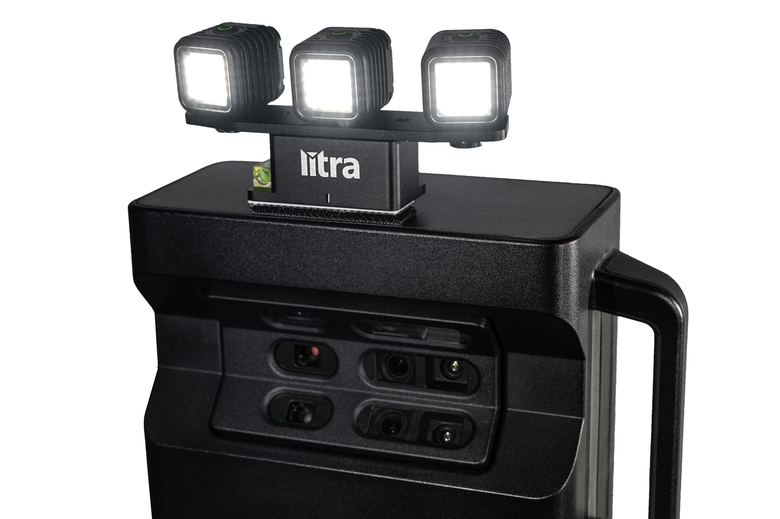 Image 1 - LitraTorch 2.0 Reality Capture Lighting Kit mounted to Matterport Pro2 3D Camera  Image 2 - LitraTorch 2.0 Reality Capture Lighting Kit mounted to Matterport Pro2 3D Camera  Image 3 - LitraTorch 2.0 Reality Capture Lighting Kit mounted to Matterport Pro2 3D Camera  Image 4 - LitraTorch 2.0 Reality Capture Lighting Kit mounted to Matterport Pro2 3D Camera  Image 5 - LitraTorch 2.0 Reality Capture Lighting Kit mounted to Matterport Pro2 3D Camera Transcript: WGAN-TV | How to (Easily) Add Lights to Matterport Pro2 Camera with the LitraTorch 2.0 Reality Capture Lighting Kit Hi All, Transcript below ... Do you struggle doing Matterport scans in spaces with subpar or no lighting such as: 1. real estate listings 2. fire/flood damaged homes and businesses for insurance documentation 3. Restoration 3. "As-Builts" 4. Construction Sites 5. Locations without windows 6. Basements 7. Crawl spaces 8. Tunnels 9. Caves 10 Mines 11. Other spaces .... Simsbury, CT-based Matterport Service Provider Tony Healy with Capture, LLC did struggle with Matterport scans that needed additional light - until he helped pioneer a solution that Litra now sells: LitraTorch 2.0 Reality Capture Lighting Kit Tony @Capture was my guest on WGAN-TV Live at 5 on Thursday, 12 November 2020: ✓ How to (Easily) Add Lights to Matterport Pro2 Camera "The LitraTorch 2.0 Reality Capture Lighting Kit is a professional solution as it has a lot more than simple add on and pointing light," Tony emailed me in prep for this live WGAN-TV show. "It's well thought out to really tackle insurance and restoration but can be simplified to meet the needs of someone just needing light, too. With the LitraTorch 2.0 Reality Capture Lighting Kit, you can easily create consistent, predictable lighting for your Matterport Pro2 Camera." Among the questions that I asked Tony: 1. What lighting problems did you experience as a Matterport Service Provider that motivated you to help pioneer what is now known as the LitraTorch 2.0 Reality Capture Lighting Kit? 2. Show us Matterport scans before and after adding LitraTorch 2.0 Reality Capture Lighting Kit 3. What's included in the LitraTorch 2.0 Reality Capture Lighting Kit? [I will do an unboxing of the kit.] 4. Show how to mount the Litra lighting to a Matterport Pro2 3D Camera (What is a 3M Dual Lock mounting tape?) 5. Show how to use the built-in levelers 6. Why did you focus on a lighting solution that uses Litra lighting? 7. Why did you decide to work with Litra to manufacture and sell the kit? 8. Tell us more about the LitraTorch 2.0 lighting (lighting wide/tall enough for Matterport?) 9. How long will the LitraTorch 2.0 lighting last on a charge? (How to charge?) (External power?) 10. Can/Should the LitraTorch 2.0 Reality Capture Lighting Kit be used during everyday scans? 11. What kind of Matterport scans are the LitraTorch 2.0 Reality Capture Lighting Kit a must have 12. What kind of Matterport scans are the LitraTorch 2.0 Reality Capture Lighting Kit nice to have 13. What about Litra filters? 14. How important are these lights for Building Information Management (BIM) projects (and why)? 15. Water proof? 16. How does the weight of the LitraTorch 2.0 Reality Capture Lighting Kit affect the Matterport Pro2 Camera? 17. Pricing for LitraTorch 2.0 Reality Capture Lighting Kit 18. Special Offer for WGAN Forum Members for the LitraTorch 2.0 Reality Capture Lighting Kit Special Offer for WGAN Forum Members Save 20 percent – and free shipping over $50 in USA – now through 30 November 2020 on: ✓ LitraTorch 2.0 Reality Capture Lighting Kit ✓ Litra 360 Mount Bundle WGAN Forum Members | Use Litra Coupon Code: CYBERNOV Best, Dan  Screen Grab from Litra Landing Page for WGAN Forum Members  Image 6 - Litra 360 Mount Bundle Transcript (Video Above) - Hi all, I'm Dan Smigrod, Founder of the We Get Around Network Forum. Today is Thursday, November 12, 2020, and you're watching WGAN-TV Live at 5. We have an awesome show for you today, how to easily light ... how to easily add light to Matterport Pro2 Cameras. If you're struggling doing Matterport scans and spaces with subpar or ... no lighting, or you just want to have consistent predictable lighting, this show's for you. Joining us today, Matterport Service Provider, Tony Healy, with Capture, LLC in Southern New England, Hey Tony. Good to see you. - Good to see you as well. Thank you for having me here. - Awesome. Thanks for being a guest on the show. Tony has pioneered a solution in conjunction with Litra, and is here to talk to us about it. Tony, why don't we begin with an example of a problem that a Matterport Service Provider would experience? Let's say perhaps a residential home that's had a fire. - I've got one for you that's, yeah. And a lot of times when we're a real estate photographer or somebody that's using Matterport, to an everyday degree, where we find ourselves in places with low light. In this case, we were doing a job for an insurance claim of a home that had a recent fire. They wanted to show the damage, but of course there's no lighting in it, and it was daylight, so there are some spots where you can see where the window is bringing in some light, but otherwise I'll try and show you exactly ... let me share my screen with you, and let's... let's pull up, got a few here. All right, here we go. So to everybody right now, this probably looks like a black screen, but in reality, this is a part of this home that when we finished up the tour, we did a second set of scans, so that we could show a before and after. And this is up in the attic. And if I am turning around, I could see there's some natural light coming in right there from the one window, but if you look around everywhere else, you could see that we start looking into some darkness. Well, move forward, and now we're in light. This is it with the light on. And yeah, you can see some shadows and everything, but you can see, it's just like if you had a flash on top of your camera at this point, because there was literally no light in this house whatsoever. - So we're viewing this as a before and an after, now you're showing after with the solution, we'll talk about the solution. But the example that you're setting up for us today, is showing up for a Matterport scan, and the space either has subpar lighting, or no lighting at all, that's the problem. And then how do you solve that? - Bingo, bingo. And then even further, we could go with just as simple as just lighting this space better, but we can also talk later on in the show a little bit more about concise lighting and a little bit more intricate lighting, but for everyday use, this is exactly what we were doing. We take this in, I even use this lighting now to do outdoors in the evening at dusk, but let me show you-- - Maybe you could show us some of the fire damage. - I'm going to bring you down to the second floor right now, look at this. So when we did this and we put this up, we didn't tell Matterport about this, but we got a call from Matterport asking us how we did this, because they said the lighting was so even, and I was excited about that, because this comes from our real updated, our latest prototype, well, actually our second prototype, which is now the model that we're sending out. - Tony, even before you get to the solution, let's walk through a little bit more. Obviously this is somebody's dream burned to the-- - Let me go to the front door real quick. Go to the door, and we can see that you've got some light coming in here. There's some light coming in here. But as you look down the hall, you can see that it goes darker and darker and darker, but the only light that's going into the house right now, is what's coming into the door, through the window. We needed to show the details. So now as we walk in, I want you to see how the light goes, it's not, it's still dark off in, further down the road, because about 20 feet or so, the light starts to fall off, but when you go into the spots that we're lighting up, look at the detail in here. And what was really huge for me was I wanted it to be able to shine a light on any property, and not only tell a story, but give some great detail both above and below, and side-to-side. But you know, the other thing I wanted to do was not have these partial seams that you see on some of these LED things, where you could tell that it's a 360, and you have overlapping scans. I didn't want people to be bothered and stop and hesitate, because the lighting was just inadequate. So as you can see-- - Tony, excuse me, let me just, Tony, let me pause you right there, and then correct, if I'm wrong, but when I look at this, what I see is, this vertical is insurance, fire, flood damage, where there's no lighting or excuse me, low lighting, right there, if you stop there just for a second, because unfortunately my wife and I, excuse me, if you can all bear with me. - I'm going to put my mask on. - My wife and I have experienced three different floods in our house, so we've seen all the insurance adjusters come through the house, the general contractor, the remediation process, the renovation, the restoration process, and certainly when that estimator has come in to estimate for insurance purposes, they actually need to see, okay, you know, what's the molding down at the floor between the wall and the floor, and the crown molding between the top of the wall, and connecting to the ceiling and to see the level of detail that you're capturing, may mean that the homeowner actually gets more money from the-- - Absolutely. Anybody that photographs residential real estate enough, understands that the better the trim, the better the make of that, or the home, the more cost per square foot it's going to be. So, yeah, essentially, that's what we're trying to show for people in a nutshell, and what was beautiful. - For those of us that are like Matterport Service Providers, we're just shooting residential. This vertical is so important what Tony is illustrating with the lighting solution that he's come up with with Litra, is the level of documentation is so good, that it will help the estimator put together all the different layers and textures of, okay, it's not just that there's a wall, but there's insulation behind the wall, there's something else that was behind the wall. And all those things add up to money and the insurance company is perfectly fine paying the adjustment, they just need to have the documentation and proof, that actually justifies the amount that's being submitted. - And, you know what's really, what was really great, in this case right here, is that this is not too long after the incident. So the information that we scanned in a fairly short period of time, maybe about two hours or so, was able to be disseminated across the globe, to whoever needed to be involved in that claim quickly. They were able to get that information, so they don't have to come trudging through here themselves and make the trip. And I want you to-- - I think that any restoration company, fire, flood, restoration insurance, documentation, any of those kinds of keywords here, looking at what you're capturing essentially in the dark, because you've added this amazing lighting solution that we'll talk about. This is a game changer of what you've accomplished. - Yeah. I'm very happy with the solution. And we worked it through a couple of different solutions to get here. I want to point out, look at that on the ground. This is what we were walking through to get these scans. So it's not for the faint of heart going into one of these, and I do recommend that if anybody ever gets a fire damaged home, that you wear some very bad clothing, you wear a respirator, please wear a respirator and wear some big boots, something to protect your feet. - This is almost the whole show in itself, what you need to know to be safe shooting in a space like this. - Absolutely. For those of us who are looking at this and say, well, I shoot residential listings, I'm not quite sure what this has to do with me. Stay tuned because we're going to talk about consistent and predictable lighting a little bit later in the show, but before we go forward, Tony, I'd like to go back to the copper mine in Connecticut. Tell us the story about how you actually pioneered the problem that you had with the copper mine, that led to the pioneering of the solution. - I'd be happy to, I just want to point one thing out to you. Everybody take a quick look at this. There is no window, no lights, anywhere in that room. That was pitch black, just like the attic from above and the level of detail. I'm just that happy about what we wound up coming up with. So there's... - Yeah, that's awesome. While you're getting set up with the copper mine, I'm going to tell our audience to stay tuned, we're going to have a special offer. excuse me. We're going to have a special offer on the LitraTorch 2.0 Reality Capture Lighting Kit, later in the show. Tony, tell us about the copper mine and how it relates to this lighting. - Sure. So the first thing is that I was asked to do the nation's first prison, which is called Old Newgate Prison in Connecticut. And believe it or not, they had about a hundred prisoners all during George Washington's time. They were all kept in a copper mine; underground. And it's really neat-- - Excuse me, Tony, could you resize this so we could see it full screen? - I'm about to, yeah. So what I want to show you is this is not, this is their lighting, and with their lighting, I thought it was too harsh. This is when you walk through their tour as a general person, this is it. I wanted to show it like it felt. I wanted to be able to make it feel as if the light falls off forward, we don't get these seams, like we were talking about the light was consistent, and the level of detail that we can look at and everything was going to be nice at the same time. And so what I wound up doing was as I'm looking for a way to build some lights around it, I did some research. I found the LitraTorch 1.0, at that time, with Litra, reached out to them and asked them, would you be interested in letting me do something like this? They were awesome. They sent me a bunch of GoPro type mounts, and a ton of their lights and said, go to it, let's talk. And I quickly, if you could see a post, I'll show you what it came up with after, here we go. This is what we came up with. A bunch of GoPro lights, our GoPro mounts, and then the lights, they're on good angles, they're on particular angles, that allowed me to have good light covers left to right, top to bottom, and not have the seams that we normally have, if you're doing a 360 or 3D when you have the overlapping scans. But at the same time, they were natural, because they're daylight balanced, and they're waterproof. And I was going underground into a cave, and I was literally sucked by the time I came up because it drips on you. - So take us back to the cave, it's really interesting, so take us back to the copper mine, if you wouldn't mind sharing your screen again. What Tony was holding up was, what you might consider a prototype or MacGyvered solution. - I love that. - And then I think you're going to show us what the lighting looked like with your MacGyvered Litra solution. - I am. I am. So let me just take you two or three steps in here, so you could see all their artificial lighting, and get a little bit of a feeling of like, yeah, it's a truly-- there are lights everywhere in here and this is them. I really wanted it to be a bit different. So I'm going to take you into the next space. This is after we had our first prototype, upload up. I want you to look at this. We turned off all the house lights. So, now it feels like a true cave. The light falls off, you could see it going off into the darkness. You feel like you're walking into the darkness and you know, 20, 30 feet up, what's going to be around the corner. But look at the top, look up around here, this is a copper mine, and I wanted, there are drips of water up here, there's green veins of copper coming through. And this truly is what your eyes actually kind of start to feel after you are acclimated after a few minutes. And so these lights on the lowest setting, which is a hundred lumens, was able to do this for me. And you can see, as we look around and we look up, look at the copper, look at the green up on the top here, look at the water droplets. The detail was fantastic, and they really held true to what I thought was closer to what the human eye would see in here, once you became accustomed to looking at it, and give people more of a feel of truly walking through a cave. Look, duck your head, boom! Because I had to, this was about three, four feet, and then we walked around the cave. Everything starts to go downhill and you can see it's dark but as we come in, it's lighting the area that I wanted to, I could have gone 400 lumens, and shot the light down further, but it wouldn't have felt much like a cave. So this was my first real need to manipulate light on top of a Matterport camera and it was very successful. - Great. Tony do you think you could post that to the We Get Around Network Forum? - I'd be happy to. - Yeah. So that'll be, that's kind of the, this is the, I guess, Old Newgate Prison, copper mine, known as the copper mine in Connecticut. I think you did this for the Connecticut State Historical Preservation. - State Preservation office, exactly. - Yeah. So that would be great. We'll post it to the We Get Around Network Forum ... WGANForum.com . And just use the search box for Litra, L-I-T-R-A, and you'll be able to tour the cave, and presumably what you'll see is the kind of the prototype lighting. - So this was the second prototype, and we had made some fine tuning. This is a little three foot tunnel that I crawled under. But look at the detail around us, right? But yes, this is the second prototype that we just made a few little tweaks before actually creating the final build. And it was more just a question of angles and accessibility as you'll see, when we open up the model, just making things easier for us to be able to tighten down lights. We added levels, spirit levels to the sides and back of the mount to help, because the ambient lighting around this light, even though it was pointing forward, is enough to give you a little idea of putting your hand up there, and you can get a sense, like I was on very uneven ground in here. A house is going to be pretty even if it's got your tripod set up, and you've got your Matterport camera level, you're good to go. - So I think that's good context to understand you are grounded in a real problem of how to deal with this space in subpar lighting, you reached out to Litra, they were super cooperative to work with you to help figure out a solution, and then you pioneered a solution, which is now known as the LitraTorch 2.0 Reality Capture Lighting Kit. - Exactly. - Which I think you sent me. - I did send you a copy. - So we're going to do a little unboxing here so we can see what this kit includes. I'll try my best not to-- - Don't cut yourself. - I'll try my best not to stab myself, that's right. So Christmas-- - So I packed this on Monday, so I hope I did a good job packaging. - Yes-- - I looked at it and I said, you know, I need to send in one, and it was Monday and I'm thinking, I've got to get that there to you soon. - Okay, so I'm opening my box, packed really well. Okay, that's a bubble wrap. - So what you're seeing right now is going to be, is as a hard shell case with a wrap on it, and the wrap has got the image of the Lighting Kit that we created, and it's got a lot of the pros, the specs and everything right on the front. There's also a back of it as well, it's got some more information too, and it'll show you a little more detail about the lighting and so forth, and give you a couple more the pros, I call them, of using the light. But there's a lot more information on the inside on a card. We have a user guide that is on the inside, along with all the other pieces that Dan is going to open up, as he thinks he's trying not to rip the cover, right? - I ripped the cover. - That's okay. It's my copy, so I'm not too concerned with that. - Okay. So I got this piece here. - Yep. So as you see, the lights come, they're not tightened down or anything along those lines, but the way you're showing it right now, the lights are on top, there's the Litra base, and then above the Litra base is a plate that's got some angles on it. And what you do is you take each light, and you take the face of the light, and you put it even with the front plane of the plate. So it's fairly simple to figure out, the middle one goes straight, exactly. So you just turn them to the angle of the plate. Now we did have on the first version, we had a way to really lock them into that space, but we found that we wanted to be able tweak things once in a while, these angles are going to help you so that you have no sense whatsoever, left or right, when you're scanning. Also that plate-- - This isn't done quite in rehearsal, but our green screen is picking up the green of the bubble. So actually, there's a leveler here that you can't see because my green screen has taken it out. And then the same thing here, I'm not sure you can see that, it looks like it's a clear, but it's actually the green little-- - The green spirit level. - Green spirit level. - And what that allows people is just to always make sure that they're getting their best alignment, really in the field. I mean, you don't have to have something extra to carry around. That stuff, we're toyed between a couple of different mounts at the moment. Right now, that's called a dual lock, and some of our feedback right now is it's fantastic. It locks everything down. But people aren't used to it like normal Velcro, you have to push it down, and hear a pop and snap it into the existing mass. So what you just took off needs to actually be taped up before taking it off. You literally mount it to the top of the Matterport it's-- - Yes. Yes. That would make sense. Okay. - So think of it as just very strong Velcro. - Okay. So my job is to do everything that could possibly go wrong and for you to point that out. So it's interesting, I've never experienced that kind of Velcro before, where I do need to actually mash it down pretty hard. - You do. - Okay. - What that does is it ensures the fact that these things are not going to fly off on you. - Yeah. It's very interesting. What do you call that tape? - It's called dual lock and it's by 3M, but we are also looking at another alternative right now, that is also a 3M. It's just a 10 pound Velcro, and it's a little simpler to put on and off. - Yeah. I'm just trying to take the backing off. - Yeah. Because you -- - I messed up, I took it off. I shouldn't have taken it off - That's okay. So can I point out something, if you open up the actual case for a second, and look inside and show them, there is a user guide in there. - I never read instructions. - That's okay. Some people do some people don't, but what's really beautiful about it is we've included a template, so everything you need to know about how to put this on and line it up to the proper settings on the top of your Matterport camera. And you'll see pictures of it online as well, but some great detail. It'll give you all the specs that are also printed on there. You could get some more information on the different parts. So you could see right there on the bottom, that not only is your a three light setup, which gets rid of all the seams, but there's a simple two lights set up if you just need to shed some light on an area, and you aren't too concerned about the overlapping scans or anything. So you can scale it. - Okay. That looks like some mandatory things, I can skip those too. - All of our FCC warnings are-- - I don't read stuff. - That's okay I'm going to jump in and you're going to help me put this on my Matterport. - What I would do right now just for the sake of more, because of the tape the stuff you took off, you could just set it up on the top and I'll show you where to put it. - Okay. So rather than actually mounting it. - Yeah. Just stick it up there and I'll show you exactly what's... So what's pretty interesting is right between T in R, there's actually a little center check mark on the actual, on the actual model itself. So right under the T and the R on Litra, we actually included a little center mark. And what we wind up doing is in the template that we give you, we show you exactly where on the top of your Matterport camera, to line up that center mark, and what we'll do is-- - Is there a line on the Matterport camera? It looks like there's a little bit of a line that I've never noticed, or is that just a scratch? - What's that? Did you scratch yours? - No, I thought that my camera had a little spot to indicate the center. - Yeah. We've got the measurements in the user guide. So it's really easy for people to just take a ruler out real quick, find their center mark, put a little pencil mark on or something and drop this thing right into place. We've got top view, side views and everything to show you how easy it is. When I look down at the top of a Matterport camera, there's actually a seam, about an eighth of an inch all the way around. And what I do is I put it inside that seam, instead of up to the front face of the camera. You don't want any part of the light to extend forward of the camera. So if you go back that one eighth inch to the seam-- - Up on my camera? A little bit of a lip? - Yeah. And you'll see a little seam, that's an eighth inch back? (Continued ...) |
||
| Post 1 • IP flag post | ||
|
WGAN Forum Founder and Advisor Atlanta, Georgia |
DanSmigrod private msg quote post Address this user | |
| (Continued ...) - Yeah, okay. - You line the front face up with that and you're all set. - Okay. So we'll call it that. How do I turn the lights on? - So if those are juiced up, you just press down once on one of them, if they're juiced up, and they're juiced up, so that's the first level, and there you go. - I could adjust them so that flat to the-- - To the face of the plate that's underneath it. Exactly. - Wow. That's cool. - Determine the angle you need. What's that? - There any adjustment, is it just on/off? - No. So the adjustments are, the fact is right now, that what you've done is you've put the first setting on, which is 100 lumens, which is what we did ... I can show you a couple examples of some homes and things like that, that we did with just 100. If you press it a second time, now you have 400 lumens. Now the 400 lumens is going to last you about two hours, the 100 is going to last you closer to four. So the battery life on these things are great. You could actually use a little like a juice pack or a battery pack, and if you need-- - I did it again. It felt like they went up again and is there a third level? - They do. And if you start going in those third levels, it's going to get a little warm on you. Okay. And so right now, what we're looking at are very bright lights, the fourth level is a strop, so that's what we're seeing now. - We're going to turn the show into a disco here. - I'm not dancing for you though Dan. Okay? All right. I'll do this a little bit. And the next step is off. So if you see, the actual light that you have, and the actual lights that I have, you see, these only had, these had a lot less LEDs on them. - Yours was the prototype. - Yeah, and they were one color lights, and what you have right now are called an N1 light, so they give a really beautiful daylight, 5,700 Kelvin light. So they're what we would consider daylight. - And if I wanted to pop it off and use it for something else, would it just screw off? - So that's the whole thing. So my staff, we all have extra lines, the cubes on their own, cause you could feel they're pretty rough, they're very rugged, they're waterproof, you could drop them. And what we do is we're real estate photographers, number one, a Matterport came second, right? Although we're building the Matterport business, real estate really is day-to-day for us. And we use flashes on our cameras. If I go into a house that's got one of those kitchen; breakfast areas; the family room; and you've got that long space to show, if we're using the flash, we do HDR or we do a flash, but when we're using flash, I'm going to want to get some more light, further down in the area, maybe in the back rooms or things. We drop these on a shelf, like a bookshelf, or we hide them behind a plant or do things like that, and it sheds more light, and it makes for really beautiful photos because you've got a better lit photograph. - How'd you activate them? - You just, we activate them by pressing the button and walking away and going back and-- - So you leave, you just leave the light on. - We just leave the light. We move them to any room that we need them. - Okay. And that's so good-- - I have to take a minute. - Yeah. Tony, I'm not so good at unboxing, so I should actually show what else is in the kit. So this is like-- - Wait, so that's very important. So what else comes in the kit is that is a charger, USB charger, and it's got three ports on it, it's important for us to be able to charge all three of these lights at the same time. And another point is that we used to use what comes with these lights, if you just buy these things directly from Litra, just the light, it comes with a little six inch USB charger. Now, if you can imagine six inches and hanging it off of your wall, you know, these lights are dangling from your socket. So what we put in were longer USB cords, so that you can pretty much put them on a table top, you can charge them pretty much anywhere you need to. - So this is, what's this and what do you call that? - So that's, I'm looking at a USB. I can't tell from that, so-- - This side would be the USB. - USB and a micro. Yup. - Okay. And so I'm going to put that in the back of the light, there actually is only one way that'll work. - There you go. - And now I just happen to have a brick with me, that doesn't come in the kit, but I'm actually discharging the light. How do I know when it's fully charged? - It usually takes about two hours to charge them. - So just leave it for two hours, there's no indicator on it for that? - Yup. - Okay. And then I noticed something else here, if it's got, I would call that a consumer grade mount on the bottom? - It does. So it's got the standard quarter inch mounts, so what you would see when you see a quarter 20, which is the little screw that comes on every tripod, you either see a quarter or an eighth of an inch, exactly. So what you see right there that you can screw them into, is also what you find universally on all tripods. - And I guess I would just add here, there's a little bit of a protector, so once I'm done charging, I want to put the plug back into the port. - Yeah. So that's a little rubber protector so that when you're, because they're waterproof lights, that rubber is actually covering the hole for where you actually do your charge. So you don't expose the electrical parts to the water. - Okay. So I'm going to screw that back in. Well, that's interesting. I don't think I did that right. So there actually turns out that there are-- - Two holes. There are two. So there's one directly in the back, so like, if you look online, we have another 360 type version for lights, where they use this little tool right here, and if you look at that with a light, you wouldn't have the light sitting on top of it, you have them out on the end. So we have-- - What do you call that one? - We have a hole here. So this is a 360. - Hold it up, let's take a look at it. - These are on the webpage as well. - Okay. Can you hold it up just for a second? - Yep. - Okay. So you put the Litra lights on each of those mounts. - Exactly. - That's going to go on your pole like a Ricoh Theta Z1. Tell you what, let's do that as a separate show, maybe we'll have either you back or a representative of Litra, and we'll just focus on the 360 camera solution from Litra. - Perfect. - Okay. So I put my lights back on, and I liked that it felt like a little bit of a prop back here, and I noticed that I do actually have to push down on it without mashing it, and then it really does feel secure. I only have one of the double mounted tapes on it. - You know that's why we were toyed between the 10 pound Velcro or in those, once you hear that pop, you know it's not going anywhere. - Yeah, yeah. That's way cool. So-- - One of the things, if I could show you too, is that, you know, with a solution, this is what we came up with before, and I really wanted to make sure that we weren't going to be taxing the motor on the Matterport camera as well, or adding any unnecessary weight to it. So what we did when we came up with the airplane aluminum there, is we scaled it down; and we got the center of gravity really close to the top of the camera, and you know, we've been using them for a better part of a year and a half now, and, knock on wood, we haven't had any issues with the motor. So, you know, I say knock on wood because you never know what happens with the Matterport cameras. - Okay. So-- - Very happy with the-- - So this mount with the three LitraTorch 2.0 lights, the three cables, the charger to plug into the wall, the case, the light instructions info on the outside, then the instructions on the inside, to kind of complete my case, and then I can actually, I'm going to take this piece of paper off. In fact, I will cut that off. - We've got a lot of printed pieces. If I need one, I know where to go. - And then I can actually zip it closed, so I actually have a handle here, I think I got it. So if I wanted to carry that as a separate kit, I can have all my lighting in one place with the appropriate cables, and it comes in a nice kit. That's the LitraTorch 2.0 Reality Capture Lighting Kit. Again, later in the show, I'll tell you how to get 20% off on this from the Litra website. Tony, so far you've shown us sub-par light, and no light situations, that seems, okay, that's obviously a huge problem, and you've solved it with this Litra 2.0 Reality Capture Lighting Kit. What about just consistent predictable light, does that fit in? I'm doing a Matterport scan with Pro camera, and I-- - Yeah. So if you, maybe real estate, a home? - Yep. - So I mean-- - Do you have an example of where you scan, where you could maybe show why the model looks different? - I could show you, well, again, the model I have to show you, it has to show you in a home that literally has no light. It's a new build with no electricity, but it's what we wound up using for a virtual tour to be able to sell a house. - How about showing us that, we'll talk about, while you're showing that. So while Tony's calling it up and getting set up, I'll let you know about the special offer on LitraTorch 2.0 Reality Capture Lighting Kit. You can save 20%, and if you're in the United States, free shipping. You simply go to the Litra site, and we're going to show you where to go on the website to find the unique link to redeem this offer, and the coupon code is going to be CYBERNOV, excuse me. CYBERNOV all one word solid-- - CYBERNOV Yeah. Is it? CYBERNOV? - CYBERNOV CYBERNOV. So it's one word, and that coupon code is going to work through 30 November 2020. And then if there are any other special offers that Litra is offering for, We Get Around Network Forum Members, come back to the Forum, WGANForum.com, simply type in LITRA and in fact, Tony, let me just drive for a moment, if you don't mind. I'm going to hit the wrong button there. Don't want to do that. Let's see. Just take me a second. - Can I point out something about the special? - Sure. - I did a little math, and if you went on and bought the three of these lights, the torch lights on their own, and now if you take it, buy this package and take advantage of the 20% discount that they have for the holidays, you actually get this entire kit for only an additional, around 40 bucks, the case, the mount, everything else. So it's-- - Cool. So what I want to show is where to find the link, cause this is actually so new. Litra is not presently advertising it to the general public. So you come to the We Get Around Network Forum, WGANForum.com. Come to the search box and just simply type in LITRA in our search box, and you're going to, when you hit that search button, you're going to end up on this page. And on this page in the form, there's a little video, a little bit more detail of showing the lighting kit, some pictures of it. You'll also see some use-cases. We'll talk more about those and boom! Down here: Special Offer for WGAN Forum Members. There's that-- - It's CYBERNOV. It's NOV, I thought you were saying now before. - Yes. Thank you for correcting me. CYBERNOV, to November. CYBERNOV, C-Y-B-E-R-N-O-V, thank you, Tony. So then here, you'll see, LitraTorch 2.0 Reality Capture Lighting Kit, you click on that and then there's the page. And you can see, again, some more pictures. You can double-check for the specs, you can see what's included. - So Dan, this link right here is not in their menu, so you can't come back to Litra and go up into their menu yet, this is being rolled out to you guys, a special offer right now, you're the first to be able to see this other than a couple of companies that do restoration right now. So you have the direct link in here, along with that discount. - So there's that long link, and if you went to litra.com and you were searching for products, you're not going to find it, it's right now. It's presently being shown to We Get Around Network Forum Members, to our audience, WGAN-TV Live at 5. And it's this page, when you're on this page, excuse me, that you can add to cart and use that code. Then, I just want to show one other page, Tony just mentioned it briefly, is the Litra 360 Mount Bundle. So that was where you have a Ricoh Theta Z1. And you have this lighting system using the LitraTorch 2.0 lights. I would be surprised if anyone would actually place them exactly that close to the camera related to the nadir, but that's a whole nother topic. I just want to let you know if you're interested in this, WGAN Forum Members can also use the code on this page as well. - And just a quick note, those lights are just there to show you that, yes, they don't go that close to it, because everybody's tripod is a little bit different, and you do want, because of the nadir, you're going to want to have those lights drop down, there is a sweet spot for them. - Yep. Okay, great. Tony, how about you drive, you were going to show a house? - Absolutely. Let's see. - So while he, again, while he's getting set up, Tony's company Capture, LLC in Southern new England, their website is CapturePics.com, CapturePics.com CapturePics.com ... And Tony congratulations, you've been doing this about 18 years as a photographer. So... - Yeah, 2003, we started. We really, 2008, we started doing a lot of real estate. 2000, we were one of the first to adopt Matterport, and we've been using Matterport for five plus years now, so this right here is with the 2.0. So what I want you to see is that there is absolutely no lighting in this house, and yet they wanted to get it on the market, they didn't have the electric hooked up yet, and they wanted to have some open houses. So I went in, used the setup that we're all looking at right now, what you can see, like if I had a flash on my DSLR, you could see a little shadow coming from behind these lights up above, but because they're diffused and they're nice lights, I'm not seeing a big hotspot. I'm not seeing any big harsh spots or anything like that. When I turn around and look, the light is even everywhere, because you can imagine the light is going with the face of the camera. So whatever light I have looking at this, I'm going to be looking here, or here, it's going to stay consistent, because the light isn't a 360-light set up, it's set up for the front of the camera to move with each segment of the scan. So that to me was very important to make sure that we had something that was going to stay consistent, and as you look around the house here, you can see that even the light going back into this fireplace and everything, really remains well lit. - I would say, on the fire example that you gave, you know, it certainly be possible to set up standalone floodlights, go to Lowe's or Home Depot, set up floodlights, they'll never obviously have the nice even lighting that you're showing, but setting up standalone lights would not be an option in a house. The insurance adjuster wouldn't care about seeing a lighting set up as you're scanning, but you're scanning a house, you can't have standalone lights. So the only place to put the lights is really where the camera is, to keep it out of the picture. - Or keep it where the camera is. Exactly. And, you know, there are going to be some cases here where you really just need to shut, we're doing some exterior restaurant drive-through type things right now, to showcase literally just the drive through areas. But because we're using Matterport cameras, we're doing it early in the morning, or we're doing them at dusk. Well, this is just, these lights have allowed me to say, you know what? I can offer this in the evening. And now that it's winter time, am I, it's dark outside at 4:30, I can actually go outside at 4:30, stay within my work hours, and go scan these drive-throughs, and get the same kind of results. - It's awesome! So no light, low light, and even in inconsistent lighting, the LitraTorch 2.0 Reality Capture Lighting Kit solves that. I wrote down a list of 10, tell me if you can add any. So real estate, so I would say, fire flood damage, anything that's insurance documentation -- - That's for restoration. - That's probably the super-sweet spot for this is renovation ... restoration. - Restoration's huge for us right now. So we just did a series of 40 historic churches, because they wanted to, A, market it, with the Matterport camera, but B, they wanted files. They wanted to be able to convert something to cat, if they had any kind of catastrophe so that they could go on, and this lighting allows you to really capture enough detail, so that folks, no matter where they are in the world, looking at this, can understand the little indiscrepancies between a floor and a wall, or that type of thing. And as new, as the camera's picking up too. - Yeah. So just in terms of use cases, the fire or flood, anything that's with insurance, documentation, restoration, renovation. - Tunnels, mines, you know, anywhere it's dark right now. - As-builts, to actually capture spaces that it's hard to see. - So we're doing a lot of recording right now for construction. We start with a drone, when we have dirt piles out there, and we can show the progress that they're making. And as the stick goes up, and they start creating it and putting electric and plumbing and all that, as they start to create the actual shell of the home, we can go in there and we can scan. So now they can see without electricity in there, plumbers, electricians down the line, can actually go back in and see one of these scans and know exactly where behind the wallboard, they can find these different utilities. - Yeah. And I know I've been on job sites before drywall goes in just at the stud stage, there's no lighting. So you're limited in terms of daylight coming in, and if you're not on the top floor, and you're trying to scan, you need lights. And, you know, I think it may be helpful just in context, Tony, you know, for the six and a half years that we've been doing the We Get Around Network Forum, there's been lots of effort trying to solve lighting. I mean, I know even myself, I want to say, almost six and a half years ago, July, 2014, I bought my camera. I think even that year I had a need for lighting, I went out and bought some suction cups, and, you know-- - We did it too. - You know, absolutely didn't work. But you know, this thing has, it doesn't have a texture that lends itself to suction cups. We've had photographers that suspended lights underneath the tripod, so the tripod, but it began, the lights didn't turn with the camera. - Can I show you-- - So many attempts. Pardon? - Can I show you another quick sample of that? Okay. So I did the Mark Twain House. It was one of our number one scans we ever did. And Mark Twain House is, when you walk into their lobby, or into their, or I'm trying to get out into the other, there we go. When you walk in, it is one lumen. It's supposed to be feeling like you're in a candle lit environment. So if you look at this picture-- - Tony, again, could you resize that? - I'm going to, yup. So if you look at this picture right here, this is done with our light, and the new camera. So we've got the good new HDR, but we also have some nice soft diffused light going on, because I actually put white diffusers on each one of the three lights, which you can get from Litra. They're like using a softbox, if you were to go in for a portrait photograph. But let me escape out of that for a second. This is what, this is what I had to do before that. And this goes back to using LEDs and lighting off the shelf, and you can see, here's a hotspot here. We hid lights everywhere through this place because it was so dark, but what wound up happening was inconsistent lighting and harsh lighting, gave us a really bright room that didn't reflect the nature of a candle lit room from back in the 1700s, 1800s. So, working with all the historics that we do, when we use lighting now, I'll open this one up and I'll show you that same room, Okay? This is the same room, and this is what it feels like with the new lighting and the new camera. So this looking into harsh sunlight turning around here, but look at this, turning around here, see the difference. We're not adding lights off the shelf from a Walmart, or you know, it's we-- - No, I've literally done that. I've been on, I remember maybe five years ago going to a college campus, and I had some extra time and so the client had already left, I'm onsite, I go, okay, I'm going to pull those lights out of the trunk of my car, and I'm setting up lights behind pillars, I'm laying down. - Every time you do it, you have to move them. - Yeah. I'm laying down extension cords. I got, I'm hiding the lights behind the pillar. I then go to scan. I'm scanning going down. I'm moving the lights behind the next pillar. So, I mean, what you've done with the LitraTorch 2.0 Reality Capture Lighting Kit, you know, like, well, that was silly, that just solved that problem. So there's, again, many Members of the We Get Around Network Forum that had been experimenting with lighting, but never really solved it until you and Litra have done, by putting together this kit that has a small, ... - Small footprint, center gravity and easy to use. You said it great when you said to you to use, really is. - Yeah. Because what I put together was that I think I'm out of focus there. - You just went out of focus a little. - Where's my camera? Here's my camera. Well, I guess I would be soft. I don't know why that is, but we'll look at it I guess. So probably something to do with that. I got everything going on here, and it didn't know whether to focus on the camera or me and anyway, but going back to the Mark Twain House, got any interesting stories to tell about Mark Twain House? - You just set me right up. So we all know anybody that's watched "Jeopardy" knows that Alex Trebek had passed away just this last week, and we're big "Jeopardy" fans, and last night, my wife and my daughter, my daughter is actually our Office Manager here in the company. And due to COVID, she's living at the house and she's 28-years-old, but, I'll show you what came up as one of the questions last night, and why I had to share it with you today, because it was pretty amazing. Let me get out of here. - So for context again, Tony, with Capture in the Southern new England area, scanned, did a Matterport scan of the Mark Twain House, and then his daughter is big fan of "Jeopardy," he's about to show us a video, let's go to the videotape. - Okay. So this is what, so this, I'm going to try and blow this up for you. It's only as big as our screen grab. So how cool was that? Because indirectly, the only way it's online is because we did a Matterport tour of the Mark Twain House. - That's awesome! So you could actually say that Matterport was on "Jeopardy" last night, Wednesday, November 11, 2020. You can say that your team scanned the Mark Twain House that was featured on "Jeopardy" ... How cool is that? - It was very cool. We all got the chills, you know? Yeah. A lot of fun. - Yeah. So if you don't mind, maybe you could post that video clip to the We Get Around Network Forum, also add the Mark Twain House, so that we can see, I think that's probably super significant, wouldn't surprise me if you post that in the Forum today or tomorrow, that you'll be getting a call by Matterport. Well, I'm sure they'll want to include it on their blog too, cause I think that's super-big news and timely, unfortunately, related to Alex Trebek passing. - It really was. It made it that much more special. - Yep. So Tony, is there a question I haven't asked you about the lighting? - We've covered quite a bit. I can't think of anything off the top of my head. I mean, as you can see we're using it, if I could just point out the fact that I started out as real estate photography, and a lot of these jobs, like the Mark Twain House, like the insurance and the restoration, have come to us because we've been able to adapt, and be able to use things like the lighting, and be able to go ahead, and it's really helped us get more jobs and actually grow the business. So I'm always looking for a tool that will help me do that. Number one, Matterport did that. It does because of where we are. We needed to do some refinement. And we really feel that we came out with a well thought out light, and it's working wonders, and we're starting to hear some good feedback from the field, and we did test this with the field too. We sent it to a number of folks across and got some good feedback. And that's how we made our final tweaks to 2.0. Awesome! LitraTorch 2.0 Reality Capture Lighting Kit, specifically designed for a Matterport Pro2 Camera. Tony, awesome! Congratulations. - Thank you. - Thank you for being on the show today. - Thank you very much. I enjoyed it. - We've been visiting with Tony Healy. Tony is the President and Founder of Capture, LLC, based in Southern New England. Tony pioneered a lighting solution, working closely with the Litra team, and you can find him on his website CapturePics.com, CapturePics.com. You can also find Tony in the We Get Around Network Forums. If you've follow up questions, Tony's WGAN Forum Member name is @Capture ... How great is that? - Be happy to answer. - Just post your questions in the We Get Around Network Forum, Tony will be happy to answer them. And so, again, thanks again for being on the show, Tony, and I'm Dan Smigrod, Founder of the We Get Around Network Forum, and you've been watching WGAN-TV Live at 5. # # # # # |
||
| Post 2 • IP flag post | ||
Pages:
1This topic is archived. Start new topic?