


Matterport Axis first impressions16681
 WGAN Fan WGAN FanCLUB Member Coeur d'Alene, Idaho |
lilnitsch private msg quote post Address this user | |
| The Matterport tripod is really cheaply made & will most likely not use it again Single pass with lidar took about 30 minutes for a home that is about 1,800 SqFt the 3 pass would I believe at least double to triple the scan time as you would need to adjust the phone 3 times per scan position. You'll also want to turn up the volume on your smartphone as the rotator is really quiet and relies on the phone to alert you when the scan is completed 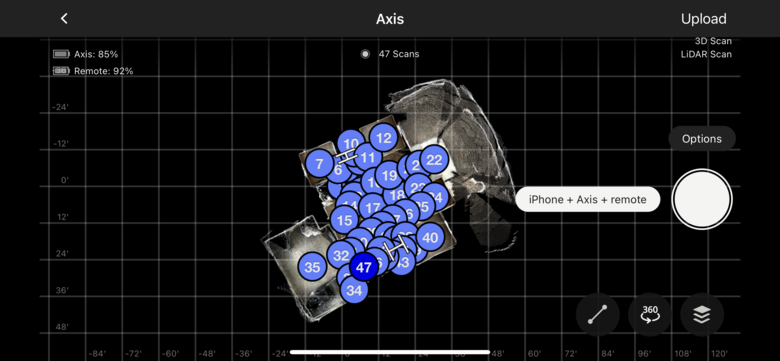 |
||
| Post 1 • IP flag post | ||
 WGAN Forum WGAN ForumFounder and Advisor Atlanta, Georgia |
DanSmigrod private msg quote post Address this user | |
| @lilnitsch Thanks for creating the video. Will be interesting to see the difference in the 360 spheres: single time around (cylinder?) versus three times around (spherical)? Too bad about the tripod. Dan |
||
| Post 2 • IP flag post | ||
|
WGAN Fan CLUB Member Coeur d'Alene, Idaho |
lilnitsch private msg quote post Address this user | |
| Post 3 • IP flag post | ||
 WGAN WGANPremium Member Lahaina, Hawaii |
Skeeter private msg quote post Address this user | |
| MAhalo for video. When do we get to see the process twin? | ||
| Post 4 • IP flag post | ||
|
WGAN Fan CLUB Member Coeur d'Alene, Idaho |
lilnitsch private msg quote post Address this user | |
| @Skeeter refresh. Just finished processing |
||
| Post 5 • IP flag post | ||
|
WGAN Forum Founder and Advisor Atlanta, Georgia |
DanSmigrod private msg quote post Address this user | |
Quote:Originally Posted by @lilnitsch Wow! Looks GREAT! |
||
| Post 6 • IP flag post | ||
|
WGAN Fan CLUB Member Coeur d'Alene, Idaho |
lilnitsch private msg quote post Address this user | |
| @DanSmigrod I wouldn't risk my phone on the Matterport tripod other than this first test job as if you are scanning outside on a patio or deck you are likely to have this rig tip over with a decent breeze as it is really top heavy. I would rather if using this device use my manfrotto as it would withstand any light to moderate breezes better |
||
| Post 7 • IP flag post | ||
|
WGAN Forum Founder and Advisor Atlanta, Georgia |
DanSmigrod private msg quote post Address this user | |
Quote:Originally Posted by @lilnitsch @lilnitsch Ugh! So helpful for those trying to decide to buy - with our without - the tripod. Thanks for testing with the Matterport provided tripod. Can you post a photo of how you have the base of the tripod set-up? Also ... I could imagine that I already know your answer ... would you even attempt using the Matterport tripod on stairs (within and without carpet)? Dan |
||
| Post 8 • IP flag post | ||
|
WGAN Fan CLUB Member Coeur d'Alene, Idaho |
lilnitsch private msg quote post Address this user | |
| @DanSmigrod I'll grab a couple photos tonight or in the morning ~ oddly its a 3/8's mount so, you have to remove the 1/4" adaptor from the Axis itself. Stairs would work with this tripod as you can adjust them in a similar manor to something like the Manfroto tripods. I like two legs on the lower stair tread and 1 on the upper stair tread |
||
| Post 9 • IP flag post | ||

|
denlee private msg quote post Address this user | |
| It looks great. What type of phone did you use? | ||
| Post 10 • IP flag post | ||
|
WGAN Fan CLUB Member Coeur d'Alene, Idaho |
lilnitsch private msg quote post Address this user | |
| @denlee The iPhone 13 Pro Max |
||
| Post 11 • IP flag post | ||
|
WGAN Forum Founder and Advisor Atlanta, Georgia |
DanSmigrod private msg quote post Address this user | |
Quote:Originally Posted by @lilnitsch Yes. I would want the same thing: "two legs on the lower stair tread and 1 on the upper stair tread" Is that doable with the Matterport tripod? Dan |
||
| Post 12 • IP flag post | ||
|
WGAN Fan CLUB Member Coeur d'Alene, Idaho |
lilnitsch private msg quote post Address this user | |
| @DanSmigrod Yes, the legs are flip locks it's just a really flimsy tripod ~ You've probably gotten a similar or better tripod with one of those "free gifts" with camera kits |
||
| Post 13 • IP flag post | ||
|
WGAN Fan CLUB Member Coeur d'Alene, Idaho |
lilnitsch private msg quote post Address this user | |
So model is processing ~ LiDAR Complete Scan (2 passes on the iPhone 13 Pro Max - I had thought it was 3 but, full was 2) I would not like to do that again as it took about TWO hours to complete. definitely more time per scan location and more data errors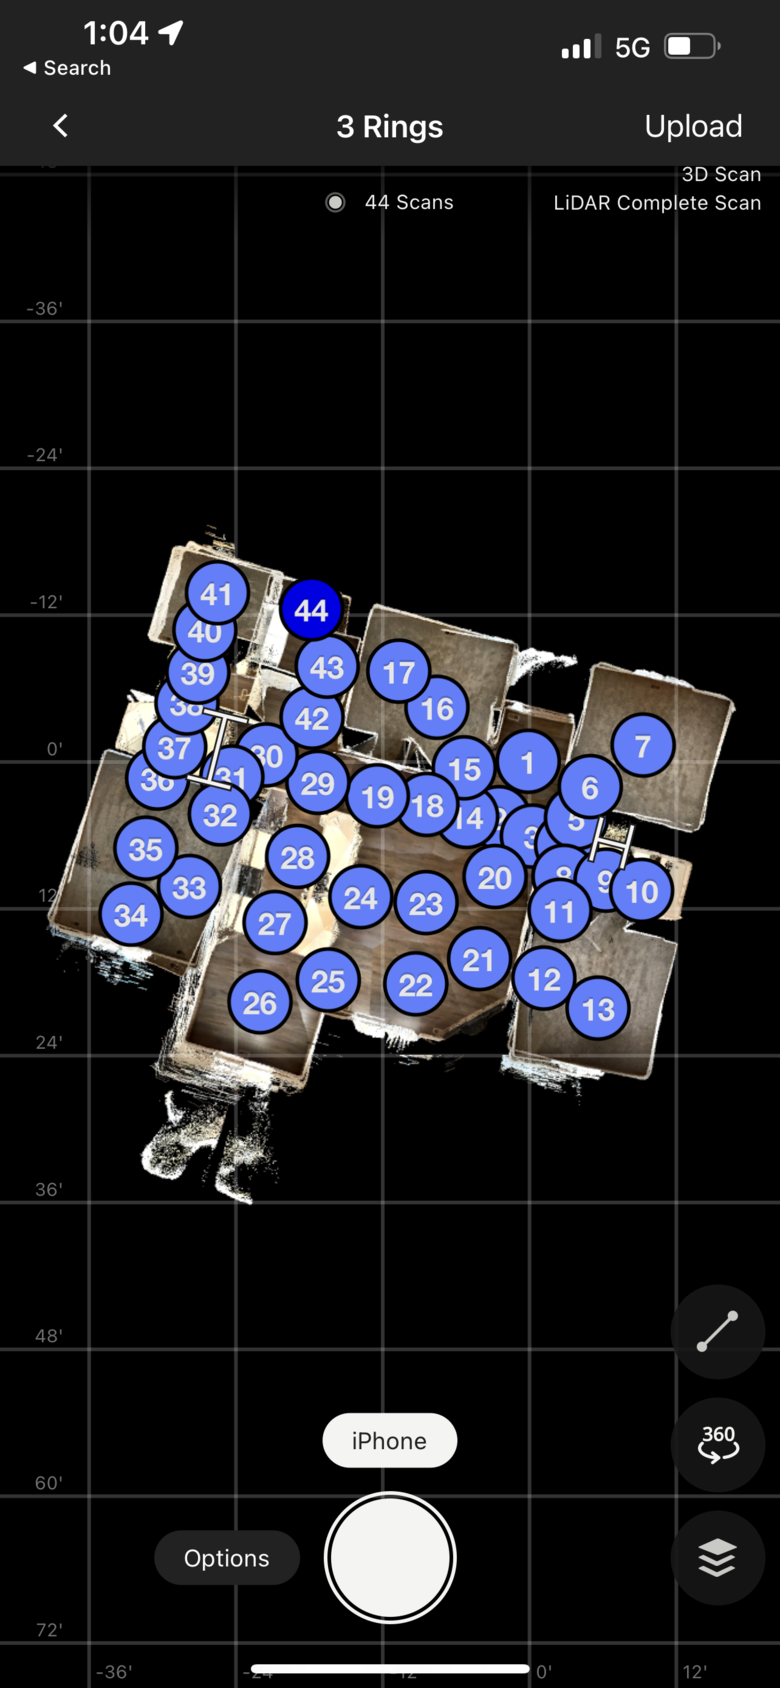 |
||
| Post 14 • IP flag post | ||
|
WGAN Fan CLUB Member Coeur d'Alene, Idaho |
lilnitsch private msg quote post Address this user | |
| More alignment errors on the full scan |
||
| Post 15 • IP flag post | ||
 WGAN Fan WGAN Fan Club Member Gilroy, California |
Dataventurer private msg quote post Address this user | |
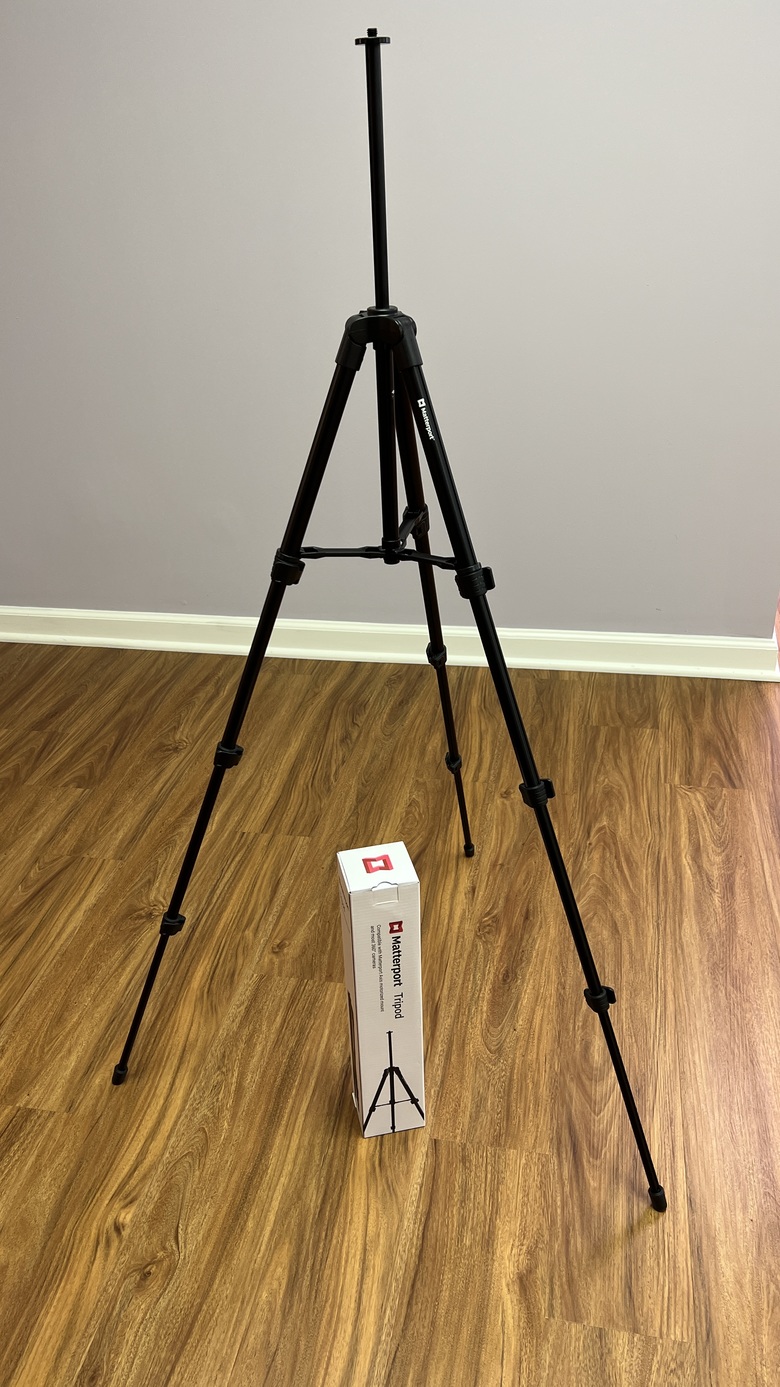
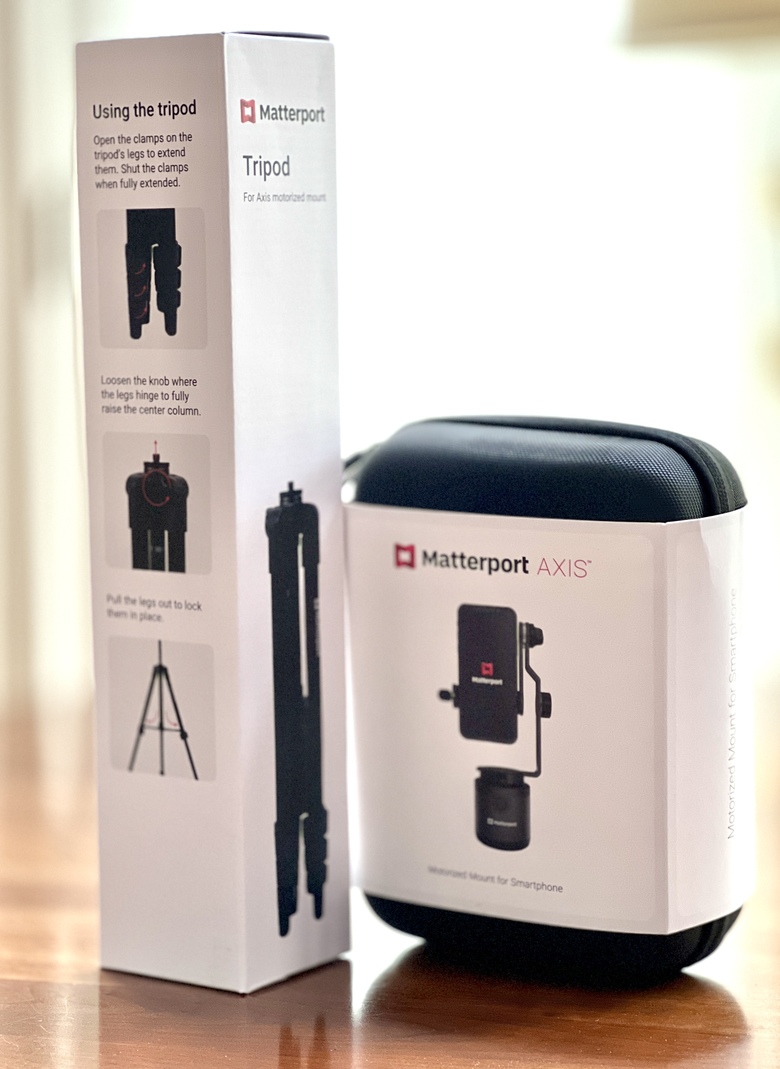
| Here is my report and review of the new Matterport Axis kit that was released on Monday, April 4, 2022 I have two sets of questions from my two “avatars”. As a real estate photographer, 1. For which applications could this product fit in my tool kit? 2. Does it deliver better quality photos that my Ricoh SC2 360 camera? 3. How much more time is required to use it with my Samsung S20 FE android phone (phone was released in October 2020)? 4. Does it appear to have a build-quality that will last regular use? My other “avatar” is as a real estate agent (Coldwell Banker in Northern California). 1. Is this a tool I could recommend to my associates? 2. Is the Startup Guide and other support materials adequate for the average real estate agent (that is a big focus of this section of my review) 3. How technically challenging is it to set up and operate? 4. How much of the “regular” Matterport operations are required and what level of technical skill would be required to be able to recommend the kit? 5. What are the trade-offs between shooting a listing with the Axis or hiring a Matterport (or other 360 photographer, as in Zillow 3D Home)? 6. Is it worth the money to at least try it? 7. Is the Starter Kit version that includes a one-year subscription to the 5-space plan worth the extra $60 (regularly $9.99/month, no annual plan at this level) I pre-ordered the Axis complete kit on Amazon on April 2 at this link of the Amazon Matterport store. The shipment (free) arrived on April 6 in the late afternoon. Here is a photo of the box: I opened the box Friday early evening. Here is what the packaging looked like. 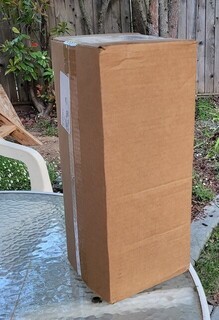 Tripod I opened the box with the tripod: 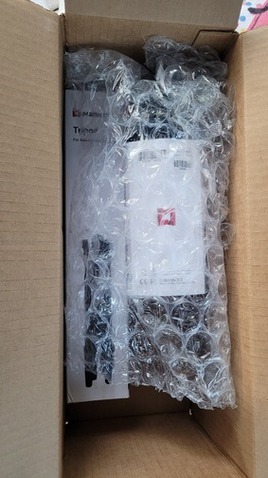 There has already been a couple comments on the tripod so I will add my observations here. This design is not the same as the one that Amir showed in the first of the two new Axis videos on the Matterport YouTube channel (Playlist page). The one he was showcasing had very short legs (about 12 inches?) and really looked more like a monopod. I noticed in the video that the Axis/camera assembly was shaking slightly as the phone was turned each time. Matterport must have ditched the short-legged tripod in favor of a more stable design. 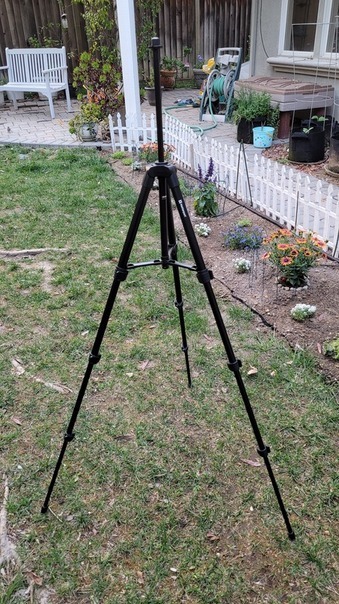 The tripod is made almost entirely of plastic. It’s 14.25 inches long collapsed. It weighs1 pound, 1 ounce. Fully extended with my Samsung S20 FE phone mount on the rotator, the camera lens is at 57”. This is a little less that the “five or five and a half feet” that Amir noted in his video. The three legs are secured with the regular finger clamps; the extension pole at the top is secured with a thumb screw. There are medium-soft tips at the end of the legs. The screw at the top is a 3/8 inch screw, which I found rather odd. Without an adapter, this tripod won’t accept any of my other equipment! I think Matterport chose the larger screw in order to more securely attach the rotator mechanism, which I think was a good choice of options. 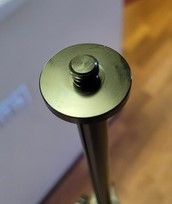 Bottom line on the tripod: It comes in the $89 kit, which is a $10 increase from the rotator-only option. For $10 it does it’s job and I think it’s a good value at that price. For users who don’t have a tripod for other photography work (like real estate agents), it meets the need here. The Rotator Kit The black rotator is 3 inches in diameter and 3.25 inches high (without the phone mounting bracket). There is an adapter in the base so it can fit on a 1/4 inch tripod. The tripod in the kit has a 3/8 inch screw, so the adapter in the Axis base must be removed (easy with finger or coin). The rotator is packet securely in the black zippered case, which is 9x7x3.25”, and filled with high-density foam with form-fitting cutouts. The case with everything in it weighs 1 pound 10 ounces. 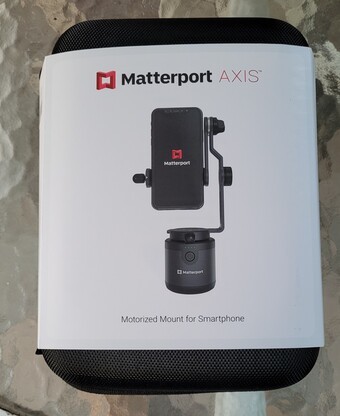 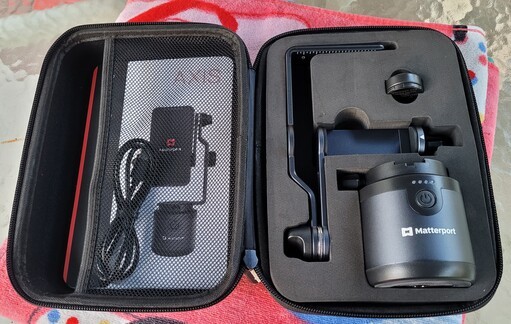 In addition to the rotator, the kit includes the phone mounting bracket, the remote control trigger, Let’s Get Started Guide, and a cable with male USB-C at both ends. (I don’t know why the cable has two USB-C connectors. All my charging bugs use the rectangular, large connector.) Let’s Get Started Guide I already had a Matterport Starter account, so my experience may be different that someone getting set up fresh. Before the kit arrived from Amazon, I opened an online chat with Matterport to inquire how the one-year Starter subscription would be handled with my existing account. The customer service rep didn’t know and I have not yet heard back from him whether the subscription can be added to my existing monthly plan, or whether the Axis will be set up on a new plan. I’m waiting on the answer and will update this thread when I hear. Here are the two pages of the Guide:  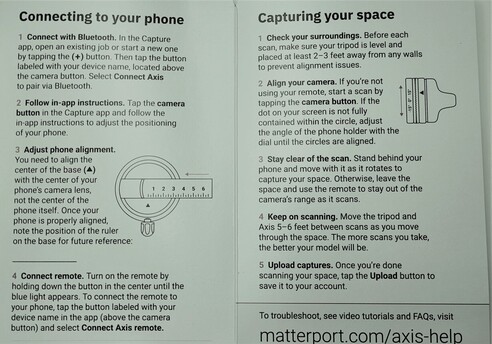 The first time I fired up the device it had three out of four green charging lights lit. I turned on the device at the step 1, Power up, and the rotator turned around. But the next step instructed me to “hold the base so the power knob and power button are both facing you”. But that’s not the way the rotator wanted to stay. I realized the second time I set it up that if the power is off, the base and mounting bracket rotate freely. Nowhere in the Guide does it tell you when to power on the rotator. I didn’t remove my phone case as instructed. It’s a very thin TPU case. That is a step that will cause some folks (non-photographers) grief if they think they need to strip their phone down every time they use the Axis. Connecting the Axis didn’t go smoothly the first time. The screen asked me for a password and suggest 0000 or 1234. I tried 0000 a couple times, then 1234 and it connected. The next time I connected to the rotator, it went smoothly without requesting a password. That hiccup was one of the small bumps in the road that I was keeping track of in my evaluation for ease-of-use for non-techies. The next step was to align the phone in the base. Amir talked about this in his first video and at the end offered a way to figure it out by flipping the phone over, taking a photo that showed the gauge on the bracket, and then figuring out using Photoshop where the mid-point was. I found an easier way. Determine which lens on your phone is the wide angle lens, lay a straight edge (ruler, cardboard, paper) down the phone and adjust the bracket so the edge of the paper hits the white arrow on the bracket base. Tighten the thumb screw and remember the point on the bracket (3.25 inches for my phone). The photo here gives you an idea of how to align; you can see the white arrow better that in the photo to make the adjustment. 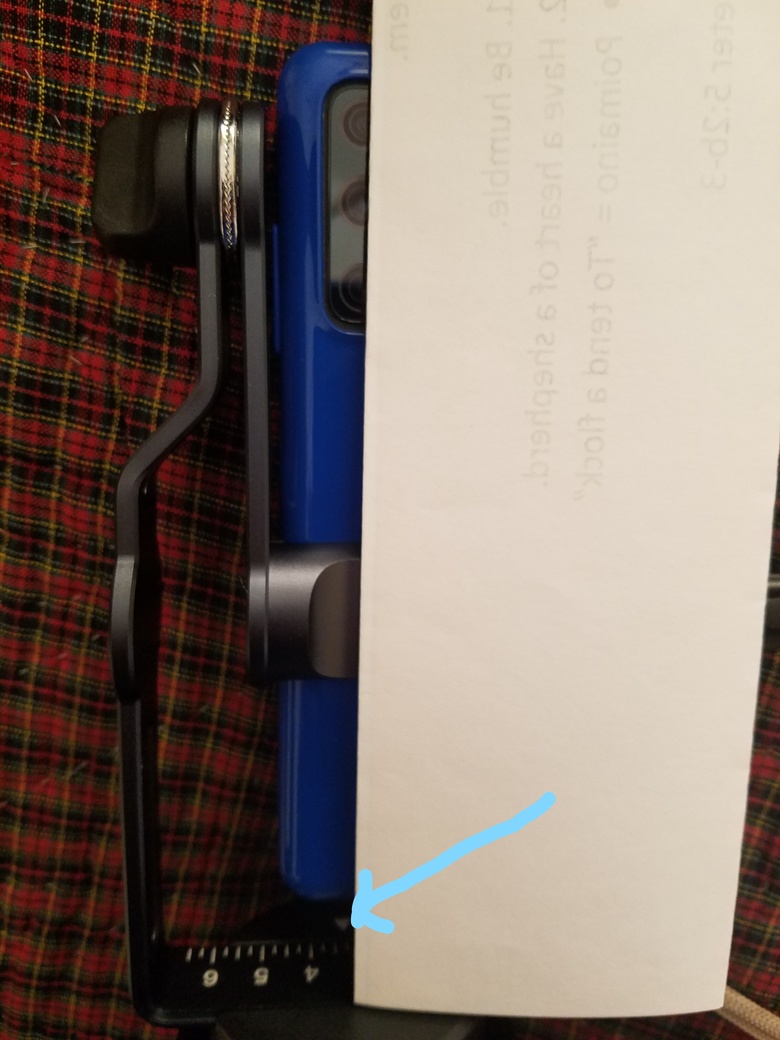 I turned on the rotator, opened Matterport Capture, opened a new space to scan, and found the Android Camera showing above the camera button. The instructions direct to tap that and select the “Connect Axis” option, which is at the bottom of the four options that were displayed. A graphic of the rotating Axis shows up with a “Connect” button. Next screen asks permission, Allow, Connecting, done. Now, “Android Camera + Axis” is displayed above the camera button. The remote is connected easily: hold down the button for a few seconds while the blue light flashes. When proceeding to take the first scan, a screen displays with instructions about how to position your phone in the holder at minus 15 degrees. I made a short video to show how the screen displays a white circle and white dot that must be aligned, then the bracket gets tightened. More on this step later. At this point the rotator and phone are ready to trigger with the remote (or touch the button on the phone’s screen). Side note: It was mentioned above in this thread to turn up the volume on the phone so the alert could be heard when the shots are done. My android did not make any noises. Not helpful… There are two modes for the scans: the Simple mode directs to position the phone in the minus 15 degree position, then shoots 6 scans as it rotates. The Complete scan mode requires loosening the knob and adjusting the bracket to the +15 degree position and running another set of shots. Timing on the captures: the rotation sequence to shoot the 6 shots takes about 35 seconds, then the processing step can take another 20-40 seconds. When shooting in Complete mode, the adjustment of the bracket for the second set of shots adds about 10 seconds. Then the 6-shot sequence and the processing time. I was seeing about 2 minutes and 20 seconds to capture a Complete set. The Ricoh SC2 was taking a shot and processing in about 20-30 seconds generally. The difference between the Simple and Complete shots – The Simple mode is only pointed down so the ceiling detail was not as clearly captured. I saw some blurring and misalignment of the ceiling light box in my kitchen. the ceiling blur looks like the blur at the tripod base, only about 5 feet out from the camera. The Complete scan has a smaller blurred area on the ceiling, about two feet in diameter above the camera location. Picture Quality Now we get down to some of the critical determining factors! Bottom line: the Axis system with my Samsung phone captured scans with at-the-same or slightly-better-clarity than the Ricoh SC2. I took scans in the same spot in the kitchen at the same time of the day, then looked as closely as possible to compare. The phone scans were just a bit more detailed. It was not a clear advantage over the SC2. The Axis and my Samsung delivered usable quality results. I also took some “360 scans” with the Matterport app to compare to a couple 360 scans that I imported from the SC2 with the Ricoh Theta app. One thing I noticed was that the Matterport-processed photos have a reddish cast to them. The color is not as rich and the contrast is lower. I have noticed this before with a couple of Matterport scans I did. I recently have been working on a set of scans for a bed and breakfast inn hosted on Kuula (much cheaper long-term pricing). I can pull the panoramas into Luminar to do post processing to get the photos to look a lot better than what Matterport is generating before I upload them to Kuula. It’s a different application (long term residence on the inn’s website instead of a couple weeks on the MLS) and the resulting tours look a lot better. This is not an Axis issue, it’s a Matterport issue. Summary Observations as a Real Estate Photographer I was looking for a possible perceivable improvement in picture quality from my Samsung S20 FE over the Ricoh SC2 (which is the low-end 360 camera of the Ricoh line at about $300). The Axis setup matched the quality of the main part of the viewing area, but required a Complete Scan mode capture to minimize the blur on the floor and ceiling areas. The extra time to capture a Complete scan series for each location in a Matterport tour adds a lot of time with no perceivable benefit to a photographer who already has a 360 camera. For a photographer who is looking to get into virtual tours and has no camera, the Axis kit with the rotator and tripod is $89. Using that combo to shoot 360 tours for a fee is right on the edge of being low quality to the point that it might limit your pricing structure to the very low end of the market. I would recommend investing in a 360 camera as a business expense that will pay for itself quickly. Observations for Real Estate Agents This could be a realistic option for real estate agents who have the technical patience and skill to set up the system and use it to shoot their own listings. Most agents don’t have more than five listings at a time so the Starter Plan would work fine. I find that agents who are listing homes in the under $700,000 range in my area (Northern California Bay Area) do not invest in 360 tours because of the cost (which I think is penny-wise and pound-foolish). If an agent is listing one or two houses in a month, they might be willing to spend the time to shoot the property with the Axis kit. Agents with a small team could assign the shoot to one of the junior members. It could work and serve as a ramp into better quality solutions for the capture. |
||
| Post 16 • IP flag post | ||
|
WGAN Fan CLUB Member Coeur d'Alene, Idaho |
lilnitsch private msg quote post Address this user | |
| @Dataventurer I have now shot a simple & a complete tour with the Axis and the complete at least on iOS had a lot of errors to where it would fail on one of the last passes of the second spin. The simple scan took about a 1/2 an hour with the garage and patio. The complete took about 2 hours without the garage or patio |
||
| Post 17 • IP flag post | ||
|
WGAN Fan CLUB Member Coeur d'Alene, Idaho |
lilnitsch private msg quote post Address this user | |
| I agree on the recommendation @Dataventurer especially if in the US or Canadian markets buying a Ricoh theta SC2, X, or, Z1 would be my recommended “budget” Matterport/360 setup. The Ricoh’s along with being a bit quicker to capture a space within Matterport also open up Zillow’s 3D home tours which boost the clients property. The Z1 is currently still my darling for the 360 cameras though Matterport is supposedly working on full support for the Theta X which would bring the full 11k panos into the Matterport tour as of this moment Matterport is only using 5.5k For my clientele I still shoot Matterport with the Pro2 as it still provides the best quality tour |
||
| Post 18 • IP flag post | ||
|
WGAN Fan CLUB Member Coeur d'Alene, Idaho |
lilnitsch private msg quote post Address this user | |
| My Thursday shoot for the Zillow portion had the Theta X & Z1 I also shot stills, Matterport, and video while on site. For luxury properties like this I carry at least two of each piece of equipment. Two Pro2’s, two Z1’s, two drones, & two camera bodies. This property was 2.5 hours to the property before any shooting. |
||
| Post 19 • IP flag post | ||
|
WGAN Forum Founder and Advisor Atlanta, Georgia |
DanSmigrod private msg quote post Address this user | |
 Matterport Axis smartphone rotator | Image courtesy of Matterport  Text Me 5 Minutes Before WGAN-TV is Live | WGAN-TV: Matterport Axis Motorized Mount Smartphone Rotator: 1st Impressions | Guests: Gilroy, California-based Dave Avilla, Real Estate Photography and Coldwell Banker Realty Agent | www.CBnorCAL.com | CalDRE # 01075392 and Jeff Nitschke, Owner, CaptureNW covering North Idaho and Eastern Washington State | www.CAPTUREnw.com | Episode #141 | Thursday, 14 April 2022 --- @lilnitsch @Dataventurer Thank you for your Matterport Axis first impressions post. Your posts are super-helpful to those deciding if Matterport Axis smartphone rotator is right for them. @Dataventurer I also look forward to seeing the Matterport 3D tour examples created with: Matterport Axis and Ricoh SC2 360 camera. @lilnitsch @Dataventurer I look forward to you both being my guest on WGAN-TV Live at 5 this Thursday, 14 April 2022 to discussion your Matterport Axis 1st Impressions. WGAN-TV Live at 5: Matterport Axis 1st Impressions Best, Dan |
||
| Post 20 • IP flag post | ||
|
WGAN Forum Founder and Advisor Atlanta, Georgia |
DanSmigrod private msg quote post Address this user | |
  Matterport Axis + Matterport Tripod Hi All, As first posted by @lilnitsch in the WGAN Forum, the Matterport tripod that ships with the Matterport Axis is DIFFERENT than the one Matterport featured early on in the Matterport training video first posted by Matterport on 8 February 2022 (see Matterport Axis training videos below). ==> Videos: Matterport Axis SmartPhone Rotator: Setup-Calibrate-Scan-Overview I will plan to ask @lilnitsch and @Dataventurer) for their thoughts about this Matterport tripod on WGAN-TV Live at 5 this Thursday, 14 April 2022. Dan Video: Matterport Axis: Unboxing, Setup and Calibration with Amir Frank | Video courtesy of Matterport YouTube Channel | 8 February 2022 | Part 1 of 2 Video: Matterport Axis SmartPhone Rotator: Scanning and Overview with Amir Frank | Video courtesy of Matterport YouTube Channel | 8 February 2022 | Part 2 of 2 |
||
| Post 21 • IP flag post | ||
|
WGAN Fan Club Member Gilroy, California |
Dataventurer private msg quote post Address this user | |
| This is my second post on this thread with a comparative model and an update on the subscription procedure. Subscription After my initial post, I discovered a Matterport card in the shipping box (under the bubble wrap) with a serial number and instructions for creating an account. I wrote again to the Matterport Support and inquired about how they handle adding the 12-month subscription plan included in the full Axis kit to an existing account. Got a reply that they are still checking on this. Comparo I created a space to compare the captured upper and lower limits of the Simple and Complete scans. I scanned two points in my kitchen/family room (Complete Mode), then took a Simple and Complete 360 scan from the same spot to be able to compare. Then I imported a 360 from my Ricoh SC2 shot from the same location to also compare the quality. I placed the scans apart in the space so they are easier to access. The re-entry icon back into the space is over the hearth. I added Mattertags to identify the scans (Complete by fireplace, Simple by frig, Ricoh by cooktop). If you tilt the view up, you can see the difference between the Simple and Complete scan coverage of the ceiling area. Since a Simple scan only points downward, the floor view that’s covered by both scan models is the same. A good way to compare the Axis/Samsung 360 quality with the Ricoh SC2 is to zoom into the wire baskets that are on the table by the back door. I find it difficult to identify which camera took a more detailed shot. I think the Ricoh SC2 (shooting in HDR mode) processed a better view through the patio door window. And observe on the Axis Complete 360 how the brown wall color gets washed out around the windows. It's interesting that the two Complete space scans and the Simple 360 scan don't show that wash-out of the walls near the windows. I don't know how to account for that... |
||
| Post 22 • IP flag post | ||
|
WGAN Forum Founder and Advisor Atlanta, Georgia |
DanSmigrod private msg quote post Address this user | |
| @Dataventurer Much-much-much thanks for sharing this and great use of tags for the Matterport Axis versus Ricoh Theta SC2 comparison. I see that you have "models" within the model What are your thoughts about Matterport Axis versus Ricoh Theta SC2? Or, we can discuss during WGAN-TV Live at 5 on Thursday (14 April 2022). Dan |
||
| Post 23 • IP flag post | ||
|
WGAN Fan Club Member Gilroy, California |
Dataventurer private msg quote post Address this user | |
| @DanSmigrod Your question about my thoughts about Matterport Axis vs. Ricoh Theta SC@?.... Join us Thursday afternoon (or listen later or read the transcript) for spontaneous commentary! Actually, I posted a fairly detailed opinion about how I saw the Axis fitting as a tool for a real estate photographer or a real estate agent. But tune in on Thursday for "raw" commentary... |
||
| Post 24 • IP flag post | ||
|
WGAN Forum Founder and Advisor Atlanta, Georgia |
DanSmigrod private msg quote post Address this user | |
Matterport Axis smartphone rotator | Image courtesy of Matterport Text Me 5 Minutes Before WGAN-TV is Live | WGAN-TV: Matterport Axis Motorized Mount Smartphone Rotator: 1st Impressions | Guests: Gilroy, California-based Dave Avilla, Real Estate Photography and Coldwell Banker Realty Agent | www.CBnorCAL.com | CalDRE # 01075392 and Jeff Nitschke, Owner, CaptureNW covering North Idaho and Eastern Washington State | www.CAPTUREnw.com | Episode #141 | Thursday, 14 April 2022 -- Hi All, Thank you for watching this WGAN-TV Live at 5 (5 pm ET) today (Thursday 14 April 2022). Best, Dan |
||
| Post 25 • IP flag post | ||
|
WGAN Fan Club Member Gilroy, California |
Dataventurer private msg quote post Address this user | |
| I had mentioned in my earlier post wonderment about how to apply the 1-year subscription to an existing Starter Plan. I received back a reply yesterday from Matterport that the engineers worked out the way that an existing email address connected with an account could have the subscription code applied. Problem solved! | ||
| Post 26 • IP flag post | ||
 WGAN Fan WGAN FanClub Member Queensland, Australia |
Wingman private msg quote post Address this user | |
| @Dataventurer Matterport seems to put an ad in your model offering to me as a viewer to download their app and do a tour. I closed it and I did not see it popping up again. I am wondering if it is their plan to do for all 3D tours? I saw a topic about it on WGAN but it did not happen to me on any of my 3D tours. I am wondering if they do it on free subscription accounts only. |
||
| Post 27 • IP flag post | ||

|
ThinkLab private msg quote post Address this user | |
@Wingman this is an awesome marketing idea, we applaud Matterport for this well done. You can see the stitching lines on the tours also that was taken with Axis 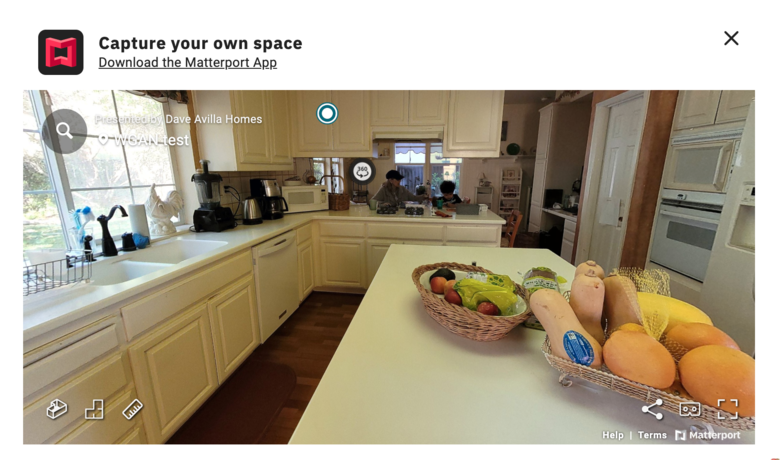 |
||
| Post 28 • IP flag post | ||
|
|
ThinkLab private msg quote post Address this user | |
 Takes you to this page? Looks like all the Axis models will have this or "free plans" , its one way they will get to scan 500 million spaces, get your clients to scan it for you and forget about the MSP's |
||
| Post 29 • IP flag post | ||
|
WGAN Fan Club Member Queensland, Australia |
Wingman private msg quote post Address this user | |
Quote:Originally Posted by ThinkLab If they are doing it on free accounts only I am kind of understanding it. Pretty much anyone who lets do something for free will advertise their own service or 3rd party one in some way. |
||
| Post 30 • IP flag post | ||
This topic is archived. Start new topic?