


Transcript: WGAN-TV: How to DIY Virtually Stage a Matterport using CAPTUR3D14935
Pages:
1
 WGAN Forum WGAN ForumFounder and Advisor Atlanta, Georgia |
DanSmigrod private msg quote post Address this user | |
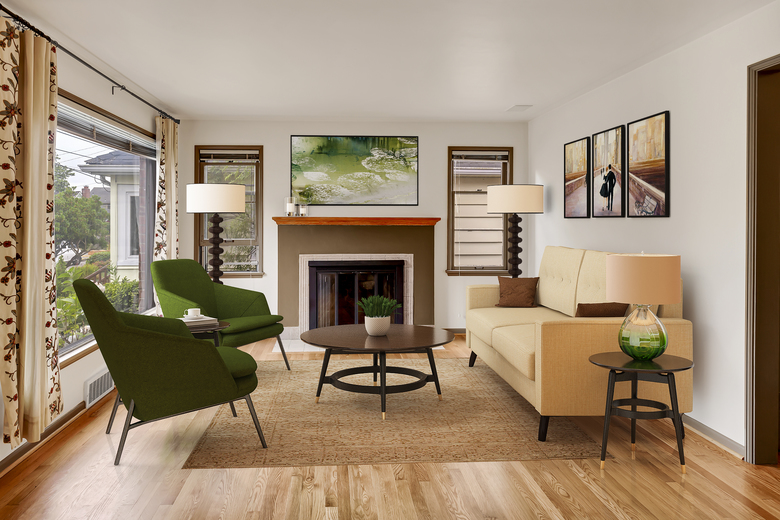
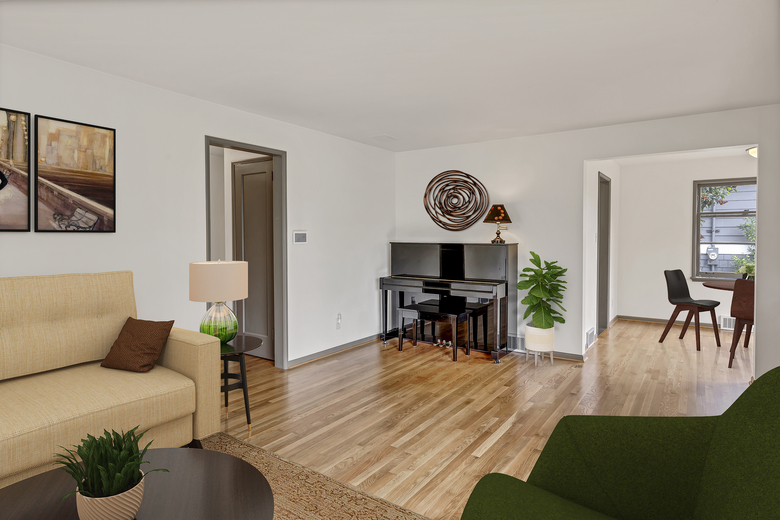
| 102-WGAN-TV How to DIY Virtually Stage a Matterport Tour using CAPTUR3D by Bellevue, Washington-based New Interior Solutions Online Interior Designer Francesca Tosolini (@ftosolini) Virtual Staging of a Matterport Tour - in CAPTUR3D – by Bellevue, Washington-based New Interior Solutions Online Interior Designer Francesca Tosolini (@ftosolini) WGAN-TV: How to DIY Virtually Stage a Matterport Tour using CAPTUR3D Hi All, Transcript below ... The following aired live on WGAN-TV on Thursday, 13 May 2021: ✓ How to DIY virtually stage a Matterport Tour using CAPTUR3D by Bellevue, Washington-based New Interior Solutions Online Interior Designer Francesca Tosolini (@ftosolini) I saw the following post in the WGAN Forum and invited Francesca to show us how she stages a Matterport Tour using CAPTUR3D ... Quote: Originally Posted by ftosolini --- Learn how to DIY virtually Stage a Matterport Tour using CAPTUR3D on WGAN-TV Live at 5. Francesca's company - New Interior Solutions - provides these services: ✓ Interior Renders ✓ Virtual Staging ✓ 360 Virtual Staging ✓ Photography and Virtual Tours ✓ Exterior Renders ✓ Virtual Furniture Replacement ✓ 360 Virtual Remodeling ✓ 3D House Animation About Francesca Tosolini If I had to describe myself in a few words I would say that I’m an Italian attracted to innovation, jeans and sneakers, self-improvement, pizza every weekend and to the fantastic old Fiat 500 (yes, I even have a painting of an old Fiat 500 hanging in my living room). However, my true passion is, of course, interior design and more specifically spatial problem-solving. I think I got my ability to make the most of a space from my parents who have always tried to find creative and practical ways to maximize every single centimeter of our small Italian condo (800 sq ft for four, tall people) and from the fact that I have lived in Italy half of my life, where everything is smaller. I mean, seriously, even the pizza is smaller! [More] What questions should I ask Francesca on the show? Best, Dan -- Related Links ✓ New Interior Solutions website ✓ Francesca Tosolini on LinkedIn ✓ New Interior Solutions on Facebook ✓ Francesca Tosolini on Pinterest ✓ New Interior Solutions on Instagram Video: Virtual Technology for Interiors | Video courtesy of Francesca Tosolini YouTube Channel | 12 February 2020 --- Use this WGAN affiliate link to create a free CAPTUR3D account and receive 90 credits. That’s enough credits, for your choice of five (5) floor plans/site plans or 90 photos retouched or apply your credits to whatever CAPTUR3D service of your choice. --- 92-WGAN-TV Live at 5: DIY Virtual Staging of Matterport Digital Twins powered by CAPTUR3D and Augmented Reality Mashup with Matterport Spaces powered by CAPTUR3D's ARConnect App. Guest: PHORIA Co-Founder and COO Steven Kounnas. Thursday, 25 February 2021 Transcript: WGAN-TV | DIY Virtual Staging of Matterport Spaces powered by CAPTUR3D ==>Start at 0:30:05 for DIY Virtual Staging of Matterport Spaces powered by CAPTUR3D 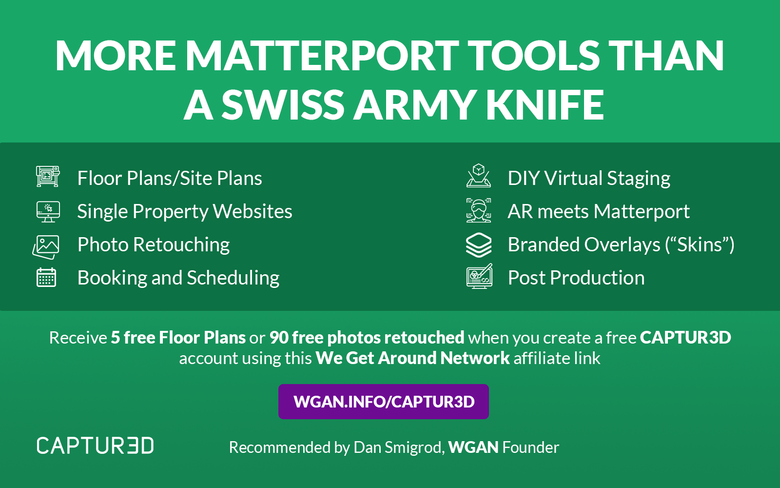 5 free floor plans from a Matterport tour when you use this WGAN affiliate link to create a free CAPTUR3D account. [To be eligible to receive WGAN-TV Training U (in Matterport) 1-Year Membership, send your CAPTUR3D receipt for $250 or more to: DanSmigrod@WeGetAroundNetwork.com] --- Transcript (Video Above) Hi all. I'm Dan Smigrod, Founder of the We Get Around Network Forum, www.WGANForum.com Today is Thursday, May 13th, 2021. And you're watching WGAN-TV Live at 5. We have an awesome show for you today. How to Do It Yourself Virtually Stage a Matterport Tour Using CAPTUR3D and here to show and tell how to do that is Bellevue, Washington-based New Interior Solutions Founder and Online Interior Designer Francesca Tosolini. Hey Francesca. - Hi Dan. How are you? - I'm good. Thanks for being on the show today. I said you're based in Bellevue, Washington, but you're actually coming to us today from your hometown in? - In Trieste, Italy. - Italy? So awesome. So we are a worldwide program. Thank you for checking that box for originating our show for the first time from Italy. - Thank you. - Yeah, Francesca, before we jump in to have you show and tell of how to virtually stage a Matterport space using the CAPTUR3D platform, why don't you just give us some background on the services that you offer and a little bit about your company and yourself? - Sure, sure. So I made a PDF because my job is visual. So I think it's just easier for the viewers to see what I do. So I am going to share my screen quickly in order to show you the presentation - And we can see your screen. That's great. Thank you. - Okay, so I'm going to make it more visible, maybe on this side. So yes, my name is Francesca Tosolini. I'm the owner of New Interior Solutions and we are a woman led company and I have put together a team of experts in 3D graphics. And because what I've done is that I just found the people who are the best at different things. And I got them all together in my team. So this is why, as you can see in a few minutes, I am offering different services. But what differentiate us especially is the fact that we are also specialized in interior design and home staging. So my 3D artists are not just very good in, you know, the technology aspect of the project, but we also give an added value in terms of interior design. Of course each project is carefully reviewed and what also makes us different is that I try to use the Italian - I'm Italian - so I like to use the Italian design for our projects which means also Italian furniture and accessories, wherever possible because it's not always easy to do that. And we help our customers with the interior and exterior renders; virtual staging; virtual furniture replacement; 360 virtual staging; and remodeling. And this is new, the 3D house animation that I will show you shortly. And of course, interior photography and Matterport virtual tours. So I made some examples here. This is an interior render from a photo, which is also interesting because we can do both interior renders from floor plans, but also from photos. And this is an example of a house in Seattle that was on the market and the agents wanted us to render it to help the buyer visualize how this house could be used. We also do the same from elevations; elevation drawings. In this case, you can see the fireplace in the living room and of course, floor plans. This is a whole kitchen of a house in Kirkland, Washington. We also do exterior renders from architectural plans; but as in the example of interior renders; we also do the same from photos. So, and this is again useful because sometimes the clients don't have either the floor plans or the elevation handy. So I just tell them, "Hey, send me a photo. We can still do the project." Virtual staging. This is the example of a nursery. And you can see that it's not only about putting the furniture into the place, but we also try to redo the floor and the walls in order to make it more appealing. And the virtual furniture replacements, like in this case, the house was in very good condition but the furniture was not really what you would say, you know, in line with the rest of the house. So we removed them virtually and replaced them in the same way. And then 360 virtual staging. This is an example in 360 virtual remodeling. This is actually a photo of my hometown. So we are by the sea and you can do the project for an agent here in Italy. He actually is using Matterport and he asked me to do a 360 virtual remodeling for him. This is the very last service I was mentioning, 3D house animation. This is just the very last part of the video, but you can see the white base of the house is actually the Matterport floor plan. I don't know if you can recognize some white in there. Of course, Matterport 3D virtual tours. This is something that many people are familiar with. And I also do interior photography. Now I'm sharing this photo because, just because, like one year and a half ago, I decided to put my photos from my home stagings, which I did, you know, in the past. So there's a certain point I wanted to take photos of my own projects. I took two photography classes at the college in Bellevue and I purchased my camera, my Canon and I started to take my own photos. And since I stopped doing that for a certain point, I had all these photos available and I was like, this can be useful to some people. So I put them on www.unsplash.com And this one is the photo that got the most downloads which is here's almost 70,000 downloads. And this is the most viewed photo and total views for my photos is more than 100 million. So it had an incredible success, which I didn't expect but I'm glad because this way I was able to help the community. But before doing this virtual project, I was a home stager for 13 years. So I did stage vacant and occupied homes in the Seattle area. And then during the course of 10 years, I decided to go back to college and I got an AA in interior design. So it took me a long time, but eventually did it. And this is just to tell that ... I do have experience in this field because I worked... firsthand on so many projects. I think totally, it's probably more than 200 projects. So these are just some examples of my stagings. And so I wanted to make this introduction, especially before talking about virtual home staging because by knowing what it takes to stage a home, this is an example that I'm showing considering a house at like an average site's house, 2,500 square feet. It takes a lot of time. It takes ... you have to visit the place first taking photos, understanding the spaces. You'll make a design plan. You have to select the furniture and accessories. Now I rented my furniture, I had only accessories. But even with just the accessories, it took me a lot of time just to make a selection because you have to decide a style. You have to coordinate colors and stuff. Then you have to pack all your items. You have to move the furniture and accessories to the property, which is always like a very small move. You stage the property; you destage -- pack everything up again and then you put them back into your storage. Now the total time for an average house is about 20 hours. And we do know that the cost of the client is, it depends, but I would say around now, especially with the seller market it is around $5,000 easily. Now, with virtual home staging, everything changes. You don't have to visit the place. Even if you don't take ... even if you don't do the Matterports yourself -- by having the Matterport that another photographer has done, you can easily understand how the house is ... the layout of the house. You do have to make a design plan in a way that you just have to think about, "Okay ... I can use this kind of furniture in these rooms," but it's not really as complicated as regular staging. You don't have to select the furniture and accessories unless you just look at the list provided and you just click on it. You don't have to pack any item. You don't have to move furniture, accessories. You do the staging, but sit at the desk comfortably. You don't have to destage the place and you don't have to put the items back in your storage. Now, considering the same house, my estimate is about two hours, but I mean, maximum two hours. Now, the cost to the client since it's a brand new technology, it depends. It would be nice actually to discuss this, but it depends if you charge by the hour; if you charge by the project. But even without really getting into pricing too much, I would say that the benefits are huge. And this is why ... I'm going to show you tonight the benefits of CAPTUR3D, which is the first software that you can use to do the staging of a Matterport tour yourself. And the benefits are the time-saving in respect to a traditional staging. You have an existing library and they do have very nice furniture. I can guarantee you. However, if there's anything that you need, you can upload your own items. The items can be scaled. And this is a feature I have used a lot. Also, you can tell your clients, "Hey, if you want to show them the house empty... you can toggle the staging on and off. They also have an option for realistic directional lighting. And this is also another very useful feature. You can place your assets both in first person ... ... when you are physically into the house or you can use the whole house to place your items. And this is a very useful feature because it makes sure that the furniture are aligned to the walls. I will show an example later. And of course, if you're a photographer who is already offering Matterport tours, this is an added value not to talk about the savings for the client versus traditional staging as we have seen before. Now, these are just a few [Things] I wanted to share with you about the size of the GLB files. CAPTUR3D right now supports only GLB files, which I have to admit, in the beginning, I didn't even know what kind of files this was. So I had a pretty hard time converting the files. That I had to [Convert To] GLB [Format] because I have a very big library of MAX files. But eventually, with the help of my team, we were able to use www.blender.org for the conversion. And after several attempts, I can say that the final result is pretty good. And the optimal size for GLB files is about two megabytes. If you have many assets in the same field of view and up to five megabytes if it's sparse across the space. Now, some important features that are coming up in case people are wondering is that we will also be able to place the assets when you are in the 2D floor plan view. And this is also a very important one. The quality of the asset will improve a lot. Over the next three months, they are expecting the quality to improve by 10 times. And this is important because I can tell you I've been playing around with this new system, this new virtual staging system. And then I sent the examples to some real estate agents because I wanted to hear about their feedback; what they thought about it. I can tell you that most of them were very excited. The only perplexity that I've received for their feedback is that the asset didn't look realistic enough. So by telling you that the quality will improve considerably over the next three months, it's very important information because that's basically the only kind of negative feedback that I've received because all the rest was they were excited and they were like ... finally we needed something like that. So these are ... - That's awesome... I think if we stopped there and while you get set up for your demo, what I'll add is that the platform that Francesca is going to be using CAPTUR3D, C-A-P-T-U-R-3-D, CAPTUR3D is like a Swiss Army knife on Steroids built around the Matterport ecosystem. So Francesca is going to be showing us one of the CAPTUR3D services that you can do it yourself. But I just wanted to give you the highlights that with CAPTUR3D, there's eight different services for Matterport. Order floor plans; virtual tour; custom white label solution; overlays on your tour; single property websites; there's post production so that you could get out of the business [of post production]. If you're so busy; they'll do it for you. Photo retouching; augmented reality; booking and scheduling and now virtual staging. And the virtual staging is actually in beta. So Francesca, in the tradition of the Tosolini family, you are leading the way in innovation. You are doing some amazing things with the CAPTUR3D platform in terms of virtual staging; sharing those examples in the We Get Around Network Forum. And that's why I reached out to you because you have this unique intersection. I think of three or four things. First, you're an interior designer now and virtual interior designer. Second, you actually shoot Matterport. So you actually understand that. And so I would say the third thing is traditional stager, now online stager; and intimate with understanding Matterport. So maybe you could share your screen and show us maybe a finished example before you actually show us how to use the CAPTUR3D tools. - Sure. - Incidentally, for our viewers, ... Use the WGAN affiliate link to get to CAPTUR3D. You'll get $90 in credits. That's good for five free floor plans or 90 images retouched, apply it to any CAPTUR3D services. The affiliate link is www.WGAN.INFO/CAPTUR3D www.WGAN.INFO/CAPTUR3D And I want to say that Francesca is now in the back-end of the content management system of the CAPTUR3D platform. Francesca. - Yes. So this is one of... I prepared three examples. This is one of them. This is a penthouse in a retirement community. And the reason why I wanted to show you this example is that the clients hired us during COVID and they had this penthouse that they wanted to show with Matterport, but they didn't want to stage. And the reason why they didn't want to stage it, I mean, traditionally stage it is because, of course, too many people would have been going in and out of the property and they didn't want to put the residents in danger. So they asked me to virtually stage it. And what I did is ... before we talk about the benefits of CAPTUR3D, I want to show you first this example just to compare the two virtual stagings that I did. This is a, let me see if it's not- - And for clarification, this is virtual furniture. This is an empty Matterport. - Empty. Completely empty. So what I did for them, is actually virtual staging of a 360 photo, which is this one. However, in order to see the room furnished, you have to click on the MatterTag, which for some people, especially if the people who are visiting this tours are not tech savvy, you have to go here and click it in order to see the space. But with CAPTUR3D, you don't have to do that because you are already into the space and you are already seeing the furniture and how they look within the space itself. Now, all the furniture that you see is virtual; some of them are provided by CAPTUR3D as you can see here, see this box on the top left. It says supplied. If you click it, it also says custom. So the custom is my library. The supplied is CAPTUR3D library. And if you look around, you have, in this case especially, every room is staged. And what I also wanted to point out is that in this case, for example, after I did the staging, the client said, "Hey, I forgot to tell you that in our community, we don't allow [area] rugs because they are a safety hazard." And if this was a traditional staging, my job was to go back to the place, remove all the [area] rugs and then put them back in storage. But with CAPTUR3D, what you do is; you just click on the rug and then it automatically show in the list of items on the right. There you go. See, it's like a darker gray stripe you deleted and it's gone. So this is just to say that corrections are so easy to make. So even if the client afterwards -- they say, "Hey, I want to you to do this instead of that," you can easily correct that without ... - Excuse me Francesca. Can you walk us around a little more so we can see how you've done different rooms in this space? - Sure. So this is the main room. And then here you have a very small kitchen at the dining room. Let me also turn around so you can see the fireplace with the art on top of it. And then the room in the back. The kitchen. And this is virtual. The flowers ... this decoration in the kitchen is virtual. And then, okay, I'm not going to share the bathroom because they don't really have a lot in it. This is the guest bedroom. And as you can see, there is a bath, there are some arts, the plants. And then we have the master bedroom over here. This is a huge place. See, with the beds, the art. And then I wanted to show you also this section because they have like a little reading nook over here. So everything is virtual and it also helps a lot to visualize how to place the furniture because what happens when you design a space is that some areas are very self-explanatory. I mean, you know that the bed is going to be there and the sofa is going to be in another place. However, I can tell you, like in this case, like the case of this big living room, let me show you on this side, because it's just easier to understand. So in this case, I have to tell you, I had a hard time to visualize how to place the furniture here. And this is what I love about CAPTUR3D is that you can play around until you find a solution that is good enough. And it makes sense, especially ... after I staged this area with the sofa and the two chairs, I realized that I had such a huge empty space. So I tried with a small table. It didn't work. Then I tried with the two chairs. So you keep trying until you find a solution that really works for the place. - So Francesca, do you want to show us around the tool palette first or do you want to actually create and as you create a room, tell us what tool you're using to do that? And how are you doing that? - I can create one for you. Let me exit from this tour. So I have to show you quickly. I have two versions of the same home. This one is staged, virtually staged. I don't know if it's going to take a while to show the furniture ... See here, you can see that little by little they pop up. - So stop me if I'm wrong, but I want to say, because of all the technology we're using to do a live show today and using CAPTUR3D and Matterport that it feels slower than it actually is. If you're just not tied up with WGAN-TV and you're just in front of your computer designing a way. - Yeah. It's much faster usually, so yeah. I think there are too many things going on for my little computer. So, yeah, usually doesn't take long. It uploads quickly. So just as a starting point, I wanted to show you this room. So I have the same house staged, but what I'm going to do is I'm going to show you how it works. And we have a vacant version. So you click on the virtual staging tag, which is here on the right. As you can see, it's still in beta version, but I can tell you, they did a great job. Then you click edit. There you go. - And again you can get to the CAPTUR3D platform by going to WGAN.INFO/CAPTUR3D You'll get 90 free credits. And even at the moment today, Thursday, May 13th, 2021, the virtual staging is actually in beta at no charge. So you'll be able to apply your credits to something else but go ahead and set up a free CAPTUR3D account. Francesca is going to show you how to do virtual staging of a Matterport space. - Yes. So I also wanted to add some design tips which I think are important. So one of the things that I've learned during my home staging years is that you have to put yourself at the entrance door, like in this case, for example. So you enter into the home from here. So this is the very first room that you see. And the first impression is the most important one. We know that. But what I wanted to point out is the fact that ... make sure that the furniture is not going to block any focal point or any selling point. For example, here we have a fireplace. For some people, fireplaces are important. So what I wouldn't do is ... I wouldn't place the couch right here across; I would place it along the walls because I want the fireplace to be visible. So what I do is I go into the assets library. Here, you can also choose between the rooms that you are or let's say the function of the furniture that you're going to use. In this case I'm looking for a couch. So I click on seating and you have many options of chairs and tables and stools, but what I want is a couch. So for example, I pick this one and I place it on the floor. There you go now. It takes just a few seconds to upload and this is an important feature. So you are able to rotate the assets because in this case, as I said, don't do this because people need to see the fireplace. So what you do is you click on rotation. I always use the commands on the right because they are more complete because sometimes you can see there also the commands here on the bottom of the screen, but these are just ... for me they are just easier to use. And I use the green access to rotate the couch. Once I do that I think it could be in line with the wall. I click again; position and I push it against the wall and then back. Now, another thing that I usually do, because I want to make sure that the sofa is placed correctly, so I go all the way to the wall. And when I see that it blends with the wall, I know that -- I touched it. So I know that I got to the point and then I slide. Now to make sure that it's in the right position, I always go into the view dollhouse. And as you can see, it is not straight. It's a little crooked. So, I click again on it and then rotate it. By doing so, I put it exactly in line with the wall and then position again, I push it out. Now, since we're here, we can also place the furniture by using this view. We don't have to be necessarily in the in-person view. So let's suppose that now I want to put two chairs, like this one. I click and then wait. So I click on the chair, there you go. And I need to find a way to make sure that it's touching the floor and this is how... Okay. Now I do the same. I rotate it. And then just to make sure, because sometimes it's not touching the floor, so I need to go back to, yeah. And as you can see it's flying. So I'm moving back down until it touches the floor. So now it's probably even a little bit crooked, but let me see. Yeah. This is just, you know, this is an example, then you can, of course change it and move it and also scale it. Let me show you how you scale it. So if you use the gray cube, it changes the size of the entire chair. However, oh, and by the way if you want to deselect, you right-click. However, if you want to just make the chair taller then you click on the axis that it's related to the size you want to increase or modify it. So this is also something very useful. You can do that easily. So let's go back here. Let's say that I want to rotate the chair, and I want to push it back. This is something that sometimes it does. - CAPTUR3D is in beta. So I can imagine at some point they take a look at that and say ... "if we're putting the chair down, it likely needs to go on the floor and we'll make it a little bit easier to put the furniture on the floor and against the wall." "We'll automatically square it up the walls." We'll put it down in parallel to the wall to begin with. - Exactly. And if it doesn't work right away, it's so easy to fix. Like say in this example, for example, I mean, it took me literally a few clicks. So yeah, sometimes though it just clicks back to where it wants to go. Okay. So let me do this. Let me put the chair. Instead of from the 3D view, just from the in-person view. I turn it around and then I move it back like this. Now, in this case, for example, see, the chair is too small compared to the couch. And again, I want to scale it and I make it bigger like this. And then again, I push it back a little bit. Now, if we want to add the rug, for example, we do exactly the same thing. In this case, I want to show you an example with a rug from my library. So I go into custom, I have recently uploaded about 36 files, which should appear here probably is taking a while to... Oh no, because I'm in sitting. --- (Continued below ...) |
||
| Post 1 • IP flag post | ||

|
WGAN Forum Founder and Advisor Atlanta, Georgia |
DanSmigrod private msg quote post Address this user | |
| (Continued from above ...) --- Okay. No, I'm in sitting, that's why. So let me, yeah, go into the general view. So these are my items and I don't know, let's go with a green rug. I find the axis that it's parallel to the floor, I click there and the rug should appear. And again, it takes a while, but it will be there. - Again, I think that's our fault WGAN-TV Live at 5 taking up some bandwidth while you're trying to do this. So, normally this is a relatively easy process. It's a little bit more real-time for you. Yeah. - Yeah, definitely, definitely. And again, also in this case, I can just, you know, click position and then, yeah. And then another design tip is also make sure that the items you placed are centered to a main element. Like in this case, I want the rug to be centered to the fireplace. And in this case, it looks pretty centered. However, if you want to make sure you go to the view and you look from above. Now see, I've noticed an error here because the rug is indeed centered to the fireplace, but it's not centered to the couch. So by doing so by changing constantly [The] view, you can catch these little errors and fix them right away. In this case, for example, I think the rug is centered to the wall, and it is centered to the fireplace. What I think is wrong is the size of the couch: is just too big. So I'm going back to my floor and I just make it smaller. And I want to make small... I think the height is pretty big, oh wait. Yeah. Sometimes I just want to make it smaller. And I want, now that it's smaller, I want to center it to the rug. And here this, and again, right-click the selected. So now it's centered to the rug, the rug is centered to the fireplace. Now we have a chair. So by doing so you give the impression that when you enter the house, you see a very open room, then you have to make sure that the flow between the rooms is good enough. Because again, when I was traditionally staging, I never used furniture to block the entryway to any room. So for example, okay, let's suppose that this is a living room. But let's suppose that instead of the window, there was a French door going into a patio. You need to make sure that this is open. You can't place a couch here where the chair is, because it gives the impression that, "Hey, if I want to go out ... my flow is blocked by the furniture. So this is just to say that when you stage virtually and also traditionally, you need to pay attention to some details. So just don't throw the furniture in it just because of it. Think about like, you really went into this place and you had to live in the place. Same thing as I mentioned before, focal point. In this case, we have a fireplace. We want some arts over -- above the fireplace just to make something nice to look at. In this case... And this is something I also wanted to share because it's a trick I recently learned. Let's suppose, okay, I'm going to select this art. And this is another thing. Look at the colors already existing in the room. In this case, the curtains are real. The curtains are green, red and this cream color, which means that it would be better to stay within the same color scheme. This is the reason why I pick the green rug because there is some green in the curtains. Now this picture, for example, has pretty much the same colors of the floor. And that's why for this room, I'm going to select it. And what I want to show you is that the best way to place art on the wall is to place it on the floor first, because if I try and I placed it on the wall, see what happens? It does this. So it's not really ideal. If you want to make sure it's placed correctly. So place it on the floor first and then use the commands to move it around. So in this case we can see the back of it. I want to rotate it first pretty much like this and then use the position arrows and go all the way back. I can actually go ... And still I have to rotate it a little bit because it's not really straight with... The fireplace is helping me to find the right axis. There you go like this, then position again. See, if you click position and you get only two arrows, the blue and the red ones, click again on position and you will get the green one as well. So you go up and then let's say, position. The blue one has disappeared. Let me move here so I can see it again. But I think it's fine, actually. - Looks high to me. - I wanted to make sure it was against the wall. Oh, let me see. I know there is a spot here. There you go. Okay. There you go. The blue one. So I go back, back, back, back until it disappears. Okay. Now I know it touched the wall and now it's in place. So this means that if I go here, I turn around. Now I have a very nice focal point, a nice rug, which is, you know, in line with the curtains, a very simple chair. This couch is pretty modern for the space, I have to say. Just use it for ... an example, but again, just make sure that the elements, the assets you're using are in line with the house itself. This is a house that was built probably in the 50s. So if I go too modern, it could not really look good. So, and then of course... you have other things that you can add. You can add light. Let's go into the supplied library and look for lighting. And lighting is important because, can you see that there are no lights on the ceiling? Even though it's virtual, I know, but this is something I check. I always checked when I was traditionally staging a house. If there were no lights on the ceiling, for sure, I would supply at least three points of lights in order to make a triangle of light. Like ... one, two, three, because this room otherwise has no light at all. So by doing so you select ... let's say this floor lamp and I put it here, then I rotate it a tiny bit. And then I- - Francesca, I almost think this is a focus group for the CAPTUR3D team, because I just have to imagine the first time you place something, you wanted perpendicular on the floor. - Yes. - My opinion is it should just snap in place. - And you know, most of the time it does. It does. Sometimes you just need to change position. Like I don't know, going here ... for example, the picture I placed above the fireplace, I couldn't see the blue arrow anymore. So by just changing position, you can get all the commands again. - Yeah. So I think you're doing some work around that I would just probably say to the CAPTUR3D team is: "the first time you put a picture on the wall -- maybe don't have to put it on the floor and slide it back into place. When you take a picture and you put it on a wall, snap it perpendicular: flat against the wall. When you place the sofa, you want it to snap against the wall and be in parallel." Now, I'm obviously not a... Don't understand how all this is done. I just assume it's magic, it works, but that's what I would love to see. - Yes. And I'm sure they will get there. Every time I talk to Alex, he always takes notes of all the problems and they are really good that ... trying to solve all these issues, and yeah this is- - And to be fair to them, it is in beta and it is free. So, and you're working right there just as it's been launched, jumping in and playing with the new tools. And so there's a lot of discovery that's still going on. Yeah. - Oh yeah. Definitely. Definitely. But the potential is huge because ... as I said before, staging, and don't get me wrong, you know, I was a stager for 13 years. So I know the value of home staging. I would never talk -- speak against it because it's really valuable. However, there are some situations where either the seller doesn't want to pay, doesn't have enough money or they don't have enough time because ... sometimes they want the house on the market the day after or even the day before. Once I had the client who called me in the morning and asked me, "Hey, can you do the staging this afternoon?" So they have no idea how long it takes. So that's always about money. Sometimes it's also about time. They have no time. They want the house on the market right away. So this is an excellent tool to provide a service in a very short time, because once you have the Matterport tour ... and once you also get more used to these tools, you can do a staging in a couple of hours. I would say- - I'm sorry, I distracted you. Could you take us through the different, I don't know whether to say assets or tools? So for example, you've gotten to supplied; so these are CAPTUR3D supplied digital assets. What are your choices of assets in terms of categories? - Yes. So these are the categories; appliances and luckily they have some appliances that you can use. And since we are in this house, because I want to show you the right example. This is an old house as you can see and see, they have no range. When I took -- the range arrived the day after I took the Matterport tour. But sometimes you think, "Hey, I don't really need appliances." No, you do. Because sometimes the houses are not ready when you go take tour. So they have the appliances and then they have items for the bathroom. In bedroom, of course they have beds, they have bedside tables. They have, and this is important, they have also very small section for kids furniture. And we all know that in every home there is ... most of the homes have a kids room. So this is the section for the bedroom, the core. And what I've noticed is that as far as ... plants, yeah. They have a pretty good selection, but usually you don't need a lot of plants. What I did with my personal library is I uploaded a lot of wall art. As you can see, they have only two or three examples and also rugs. Yeah, they do have a pretty nice selection. But what I did with my- - As you mentioned, CAPTUR3D is building out the platform so that the library will start to grow exponentially in all categories. - Yes. And that's only for residential homes, but also for commercial. They are working on adding a huge section of commercial furnishing and the core for big office spaces. - Can you select an entire suite of furniture? Let's say a bedroom set and place the bedroom, drag the bedroom set into the bedroom, or is it still you need to add one piece of furniture at a time? - So that's an excellent question. And I'm not sure they are doing that. - Okay. - However, based on what I experienced with CAPTUR3D is that if you have a furniture set and you cannot divide the single pieces, like the bed separated by, you have a block of furniture. So if the room doesn't have exactly the same size, it could be a problem to place them exactly where you want them to be. - Interesting. I was actually thinking of something else; which is - there's 10 digital assets. I've dragged them in one drag, but now I can place the chairs where I want them, the pictures where I want them. But to say, "Oh. This is the Francesca Collection for Italian bedroom styling; modern. Oh, okay. I grabbed those 10 pieces in one swoop, placed it in the bedroom and then started moving it around. That's not presently, we don't know whether that's coming or not. - Honestly, I don't know. I cannot say it's not coming. I don't know. We never discussed that. But it's a good idea. - You mentioned that you imported your furniture as GLB files. Is there a whole separate marketplace of GLB furniture? And you just go to Fiverr or 99Designs or whatever platform. Is there some platform for buying digital furniture in GLB format? - There is. However, GLB is not very popular. I can tell you that. So I tried to find GLB ready files. And the one that I used was I think www.TurboSquid.com and I did... - Spell that for us. - www.TurboSquid.com www.TurboSquid.com I think it was that one. - Okay. And I did find a ready-to-use GLB file. It was like a stool, ... stool, a small stool. And I uploaded it into the program and what happened is that I could see the axis, but I couldn't see the place itself. So I went back and forth with Alex trying to figure out what was wrong. And so eventually, what he said is, "Hey, try to use Blender.org for the conversion from other formats. Now, the formats that I used were MAX files, again, just because I only work with MAX files for my project. So I already have a huge library with MAX files and I didn't want to start to use other formats. - Okay. So Blender maybe get you back for another show to talk about how to convert MAX files to GLB files using www.Blender.org, perhaps you'll entertain that. I noticed on the right side is lighting. Could you take us into an example of how you're doing your lighting? - Sure. So the lighting feature is there just because as you can imagine, if you take the Matterport in different moments of the day, the lighting can hit the room in different ways. So the lighting is there just because by selecting it, you try to make the object as bright as the pieces that already exist in the space. So this is a feature that you can use of course, even if you have all virtual elements. However, it is particularly useful when you already have a real piece in the room and you want to make the lights at the same level. See, like in this case, it's brightening up the whole room. Now, the more- - So is brightness, is that used specifically for a piece of furniture in an area of the space? Help me understand what you do in lighting? - Yeah. It affects the overall brightness of the property, the whole property. And again, I mean, the whole virtual elements that you have placed in the room, because you want to make sure that the brightness matches the real brightness of the room. You know what I mean? So by doing so, if you can see if I go higher with the brightness, I don't know. Maybe you notice with the chair and the rug. Can you see that it gets brighter? - Yes. It's a big difference. Yes. - Yeah. Yeah. So you can fix this, but it fixed the whole property, not just one room. It affects the whole property. - So if I place the light where the sun is. So for example, it looks like it might be coming through that big, large picture window. So is there a way to pour more light into the room from the perspective of where the natural light is coming from? - Well, as far as I understand, it is not directional, even though I think that will come with the next updates. Right now is just from above. See? So it's not like, you know, I want the light to come from the window and hit the chair on the side. You can't do that now. You will probably be able to do it later on, but for now the brightness level that you apply affects the furniture, like a whole end from above. As you can see, if I go higher, it is like the light is hitting from the top. See? So this is not something that you can use. For example, you want some light to come from the lamp. You can't do that yet. - Okay. - It's just an overall light brightness. Probably if I go further away, you can see better. - Can you add fire to the fireplace with CAPTUR3D? - Not yet. - Okay. - But that's a good idea. Yes, you can do that yet. - I just would imagine that that would be some type of asset that lets you go from opaque to translucent, so somehow it adds fire. - Oh, yeah. That's an excellent idea. That is an excellent idea. Yes. - Can you change the opacity of an object? - No, you can only, for now you can just, you know, change the brightness. The object, the only thing you can change is the scale. You can do that, but for now- - Can you change the color of furniture or floors? - You can't. You can't. - Okay. - Yeah. Another thing that I think would be very useful, for example, is let's suppose that I want to change the scale of this chair. So let me move this here. And this is something that happens to me. Okay. So this is the overall scale, but this is just for an example, like, you know. I change the scale and I want two chairs, two identical chairs in the same room. Now I can't duplicate this. So I have to make another one and apply the same dimensions. - For clarification you cannot presently do- - I cannot. No. That's also a feature that would be useful. I'm sure they will, you know, do it in the future. - I suspect Alex is watching the show. - Oh, yeah. - "Hey Alex, we'd like a duplicate chair feature, please." - Yes. Yeah, because sometimes as I said ... the scale tool is the one that I probably use the most. And sometimes when I have doubles, like two chairs, I have to do everything all over again making sure that they match. So that will also be a very nice feature to have. And again, I'm sure that, you know, the guys at CAPTUR3D will work on it. - Okay. So is there anything else you want to show us in this room in terms of techniques or tips of adding furniture? - The only thing I wanted to show you, which I think is also pretty good is I wanted to show you how you can actually mix real elements with the virtual ones. This piano is real. And what I like is that since you can add, you know, items, Okay, let's suppose the plants. You can add, okay, let me go on the floor. So what I like is that with the position command, you can pretend it's on top of the... Okay, now I'm just getting closer to the wall ... make sure that it's right there. You can pretend that it's sitting on top of the piano. And I think this is great because ... you can mix different, real and the virtual elements together. And this is also helpful because for example, let me go downstairs, floor one. Okay. So this is... I want to show you what I did just as an example of mixing real with- - Is it in this model or the other one? - I'm sorry? - You have two different models of the same space. Is it in the other one? - No, no. It's this one; this one. So in this example, we have a real desk and there's nothing else basically in the room. Can you see? So what I loved was the fact that I could add a virtual chair to a real desk and that's really useful. Because sometimes that's all you need. And sometimes also since they are mixed together, you can't tell that the chair is not real. Wait, let me move myself here. So if I go here, I rotate it and I push it back a little bit, push it in. See? I think this is great. Then look also at the scale. It's perfect. I didn't have to change the scale in this case. It really looks like a chair with the desk. - Can you take us back to your finished space? It doesn't have to be this house, but just a finished room. - Sure. - It may be where we were at the beginning of the show. While you're getting there, I think the question I would ask is if this seemed like it takes a lot of time and maybe that's because you're talking to me. And do you find that after you start doing this awhile that you get really good at it and your workflow just speeds up? - Yes, it does. It does. As you have seen, the only hiccup that I find is honestly, just when the furniture doesn't snap into the right place. So that's the only issue. Otherwise it's really, really easy. Yeah. Once you get used to it, you go really, really fast. Although you also have to have the right furniture because sometimes you have an element that is missing and then you realize, "Hey, I have to find it. I have to convert it and I have to upload it." But if your library is pretty complete, you can really do it in a pretty short time. - Okay. Again, I think because we're doing WGAN TV Live at 5, you're traveling, we got a lot of things going on. It's taking a while for everything to assemble. But if you're doing this at home, this furniture would pop up right away. - Yes. Yes. And then imagine you are at home, you are drinking your coffee, you know? So it's also a pleasure to do because I find it relaxing and also creative. So it's not ... a hard job. It's actually very pleasant. - Okay, good. Could you take us just -- maybe just rotate around one more time here, take a look at this room. - Okay. The couch is coming. - What we're looking at is all digital added assets. This is all virtual staging. The pictures, the vans, the plants, the lamp. - Correct. Everything you see is digital. All the furniture and accessories are digital, completely digital. - Okay. Awesome. And unless you had something else you wanted to show us, I was going to stop us there. - Yeah. I think we covered pretty much everything. - Okay. Awesome. Francesca, this has just been a real treat. It's fun to see a traditional stager turned online stager who is also a Matterport photographer and real estate photographer, use the latest tools: CAPTUR3D to do virtual staging. So that's pretty cool. And I would imagine that our audience today gets it that they can either do it themselves, or they can reach out to a company like yours, New Interior Solutions, www.NewInteriorSolutions.com and engage an online interior designer like you to do it for them. And you already understand Matterport, CAPTUR3D aesthetics in terms of design. So you can speak in shorthand with your clients. I think that the question I would ask before we wrap up is it seems even before you touch a piece of digital furniture, you should have some type of plan or vision. I don't think we get in our car and just randomly drive and end up in random places. We kind of have a destination in mind. So that's sort of a metaphor. What is it in your mind of what the destination looks like even before you pick up a piece of digital furniture? - That's something that the REALTOR has given me, because before staging everything, I ask questions. I ask, "hey, what's the demographic." "Who do you think is the ideal client for this home?" "How old is the home?" "Where is it located?" This is something you need to ask because that's a huge help. And then of course ... Once you see the photos of the house, that gives you a hint on the style. But mainly I try to imagine myself as the buyer, because most of the time we do multiple to sell houses. So I try to figure out, okay, if I'm the buyer, what do I want to see in this house? "I want to see big spaces." "I want to see flow." "I want to see a good aesthetic." So the vision changes with every project because every project is different. But my only suggestion is talk to your clients. You know, the communication has to be very clear because this way you make them happy and you also make the seller and the buyer happy. So it's just about communication. - Awesome. So there's a lot of -- even if you're thinking about what the potential buyer of the house is interested in and you've mentioned three or four things, ultimately they're not the one paying for your services. It's really the real estate agent that's engaging you. So, listen carefully to the real estate agent's vision of who that potential buyer is and what is special about that house that needs to be showcased with virtual staging. - Absolutely. Yes. That's correct. Yes. - Yes. Awesome. Francesca, thanks for being on the show today. - Thank you. It was a pleasure. We've been visiting with Francesca Tosolini. Francesca is the Founder and Online Interior Designer of New Interior Solutions. You can find her company at www.NewInteriorSolutions.com Francesca is located in Bellevue, Washington, where her company is based and is visiting with us today from her hometown in Italy in ... - Trieste. Trieste. - Yes. So for Francesca in Trieste, Italy. - Yes. - I'm Dan Smigrod in Atlanta and you've been watching WGAN-TV Live at 5. - Thank you, Dan. # # # # # # |
||
| Post 2 • IP flag post | ||
 CAPTUR3D CAPTUR3DTeam Melbourne, Australia |
AlexHitchcock private msg quote post Address this user | |
| Fantastic webinar! Thank you @ftosolini and Dan for hosting |
||
| Post 3 • IP flag post | ||
|
WGAN Forum Founder and Advisor Atlanta, Georgia |
DanSmigrod private msg quote post Address this user | |
| Video: Masterclass - Introducing Virtual Staging (BETA) | CAPTUR3D | Video courtesy of CAPTUR3D YouTube Channel | 11 June 2021 --- Use this WGAN affiliate link to create a free CAPTUR3D account and receive 90 credits. That's $90 which is good for five (5) free CAPTUR3D Floor Plans/Site Plans; 90 images edited (and other options). --- 5 free floor plans from a Matterport tour when you use this WGAN affiliate link to create a free CAPTUR3D account. [To be eligible to receive WGAN-TV Training U (in Matterport) 1-Year Membership, send your CAPTUR3D receipt for $250 or more to: DanSmigrod@WeGetAroundNetwork.com] |
||
| Post 4 • IP flag post | ||
Pages:
1This topic is archived. Start new topic?